

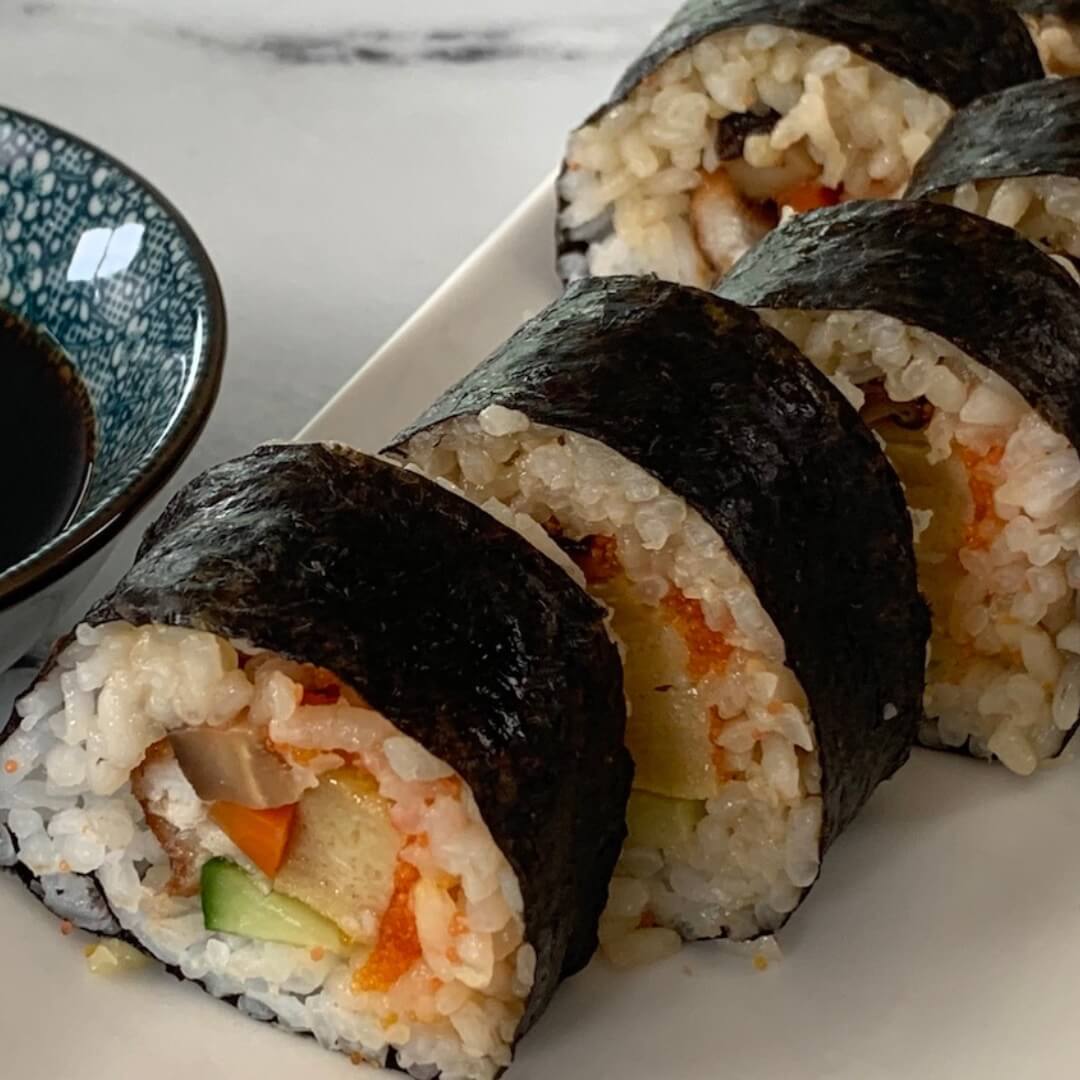
Literally translating to “fat sushi,” futomaki is a thicker sushi roll that’s popular around Japanese holidays and other celebrations. The thing that I find especially fun about futomaki is that each family makes their own version using ingredients that they enjoy. As such, you will find a wide variety of flavors in futomaki depending on where you go and who you enjoy it with.

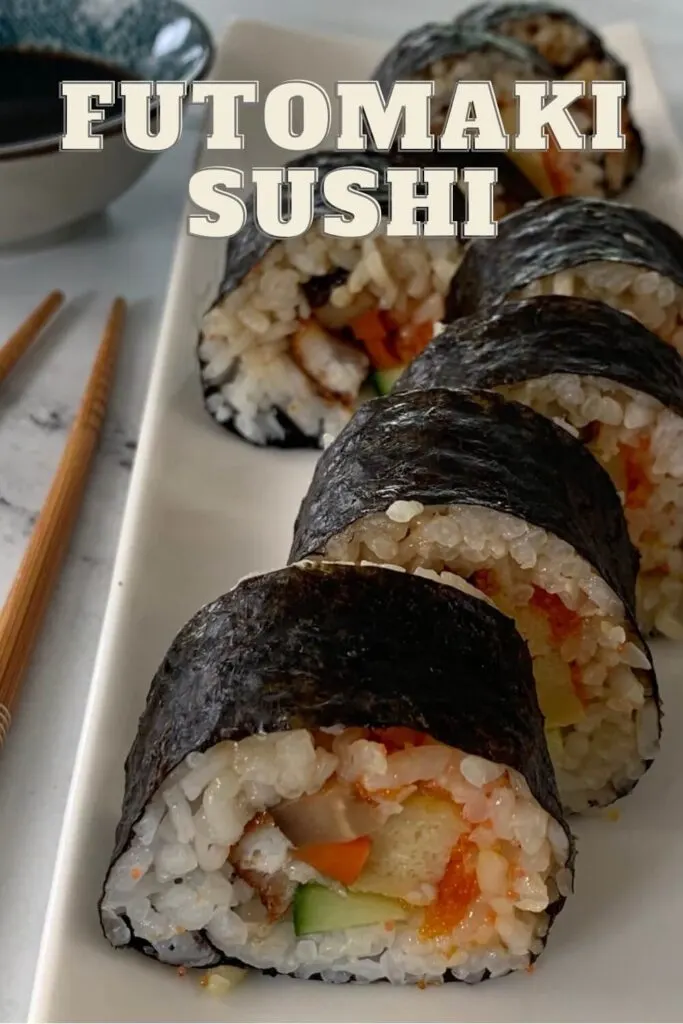
Table of Contents
What is Futomaki?

In Japan, most sushi is served nigiri style (a slice of often raw fish draped over sushi rice). However, futomaki is a sushi roll that is traditionally Japanese and is commonly eaten throughout the country.
Futomaki is a thicker sushi roll that contains a variety of ingredients that vary from cook to cook. Often enjoyed around holidays or potlucks, futomaki allows each cook to tailor their ingredients to the occasion for which it will be served. When I make futomaki I use unagi (freshwater eel) drizzled with unagi sauce, seasoned carrots and shiitake mushrooms, masago, cucumber, and tamagoyaki slices.
Some other popular ingredients are kanpyo (Japanese gourd strips), shisho leaves, spinach, and other types of fish. However, futomaki gives you the freedom to add whatever you want so if something else sounds good in your roll, I urge you to give it a try and make it your own.
How to Make Futomaki
Futomaki is fairly simple to prepare though there are quite a few ingredients. Below I will walk you through my family’s recipe step-by-step:
1. Thaw the eel fillet by putting it in the fridge the night before you plan to use it. If you are in a time crunch, you can also thaw it quickly by running the package through warm water.
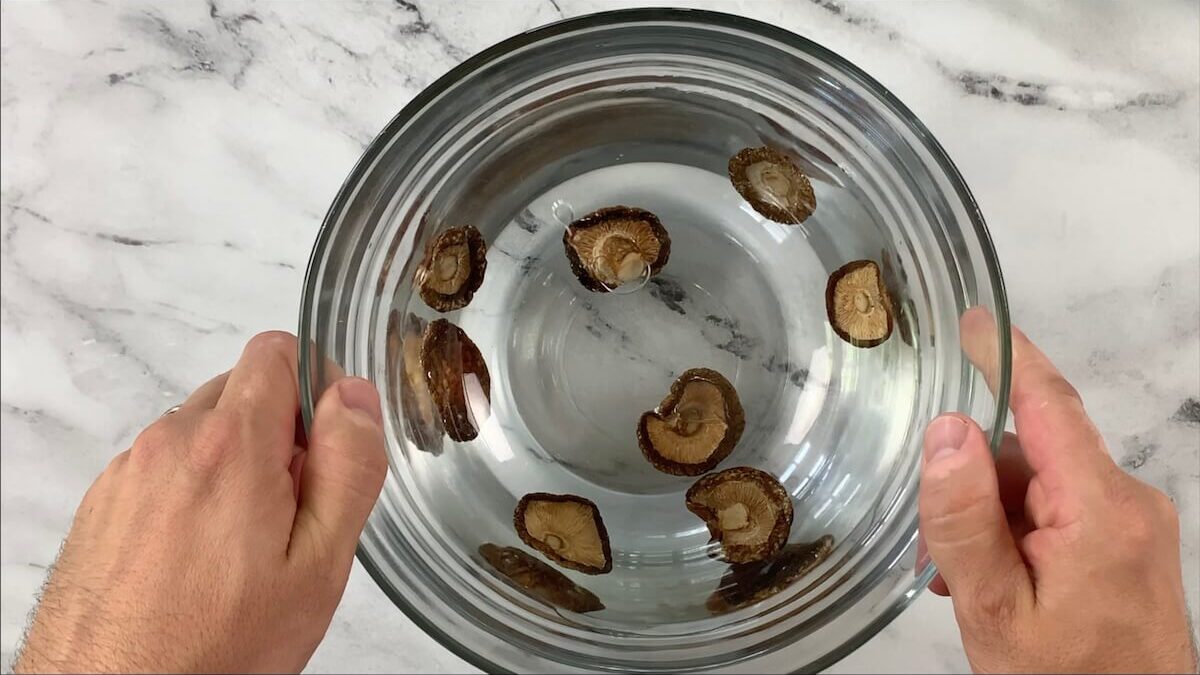
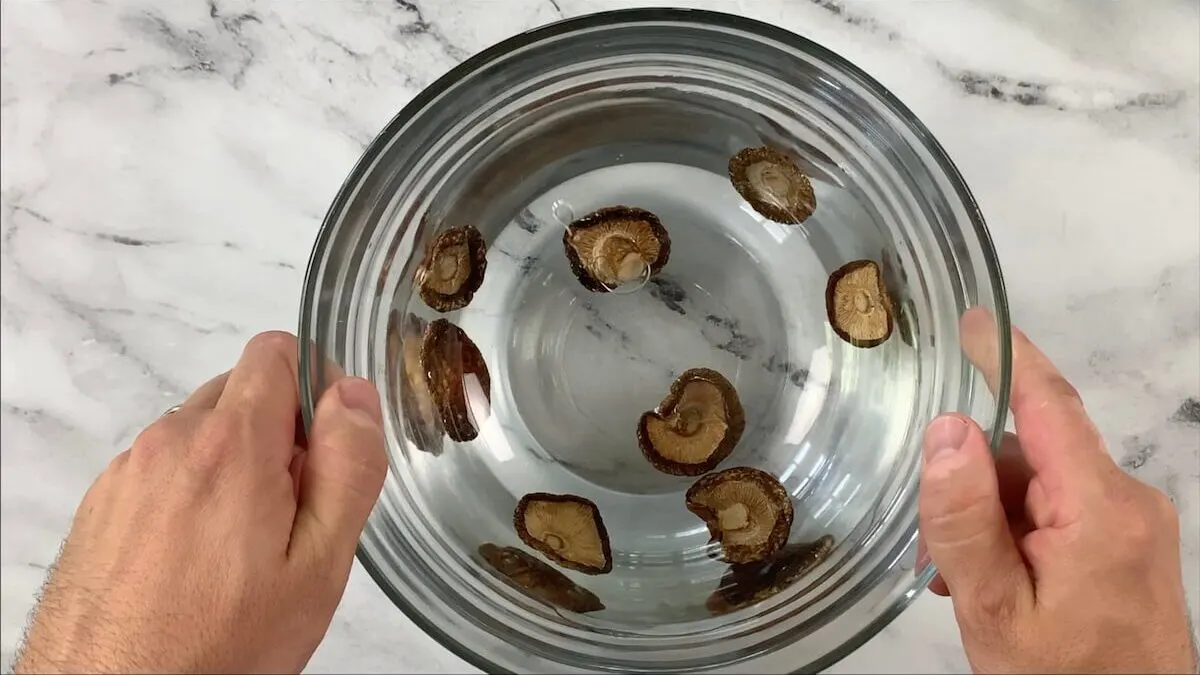
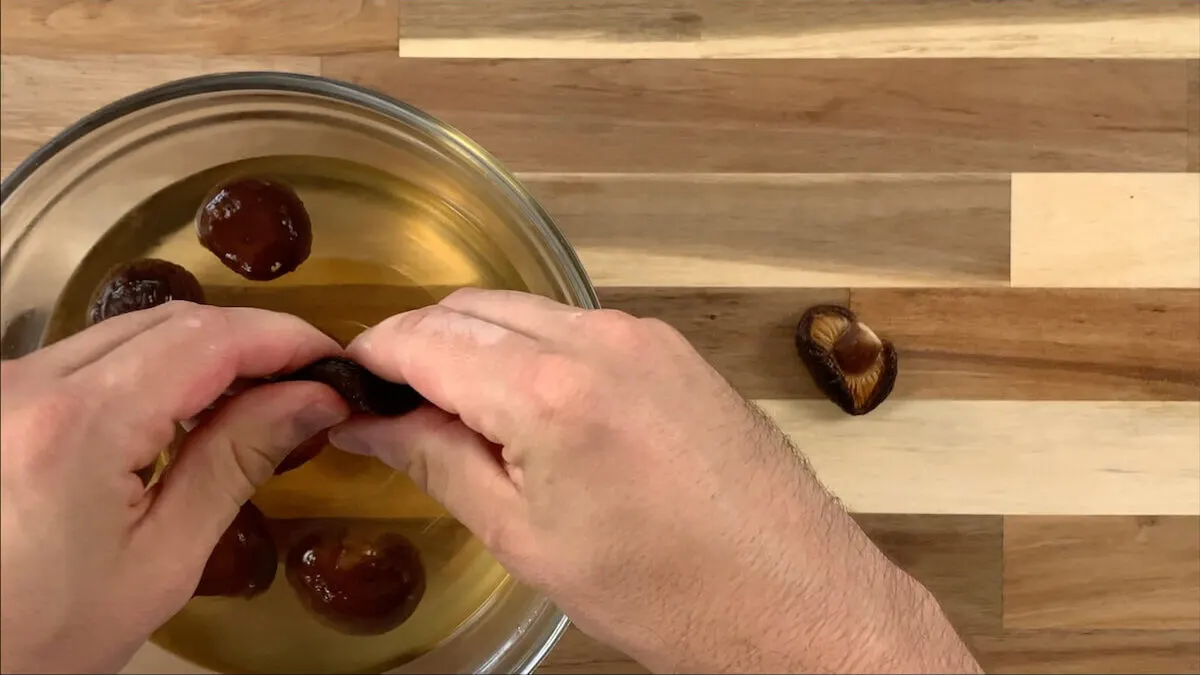
2. Rehydrate your shiitake mushrooms by soaking them in cold water for at least 20 minutes. However, the longer you soak your shiitakes the better (overnight in the fridge is ideal).
Cook Sushi Rice
1. Rinse 1 2/3 cups of sushi rice by placing it in a colander and running water through it until the water is clear.

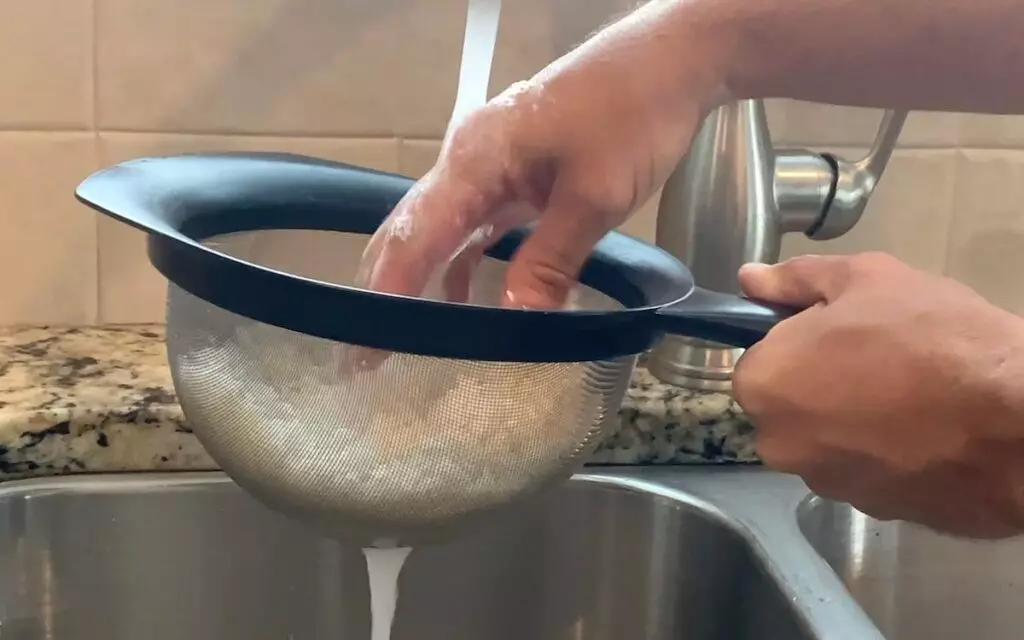
2. After the rice is rinsed, add it to a sauce pan with 1 2/3 cups of water. I would check the instructions on the sushi rice package to see exactly how much water to add as it can vary depending on the brand.
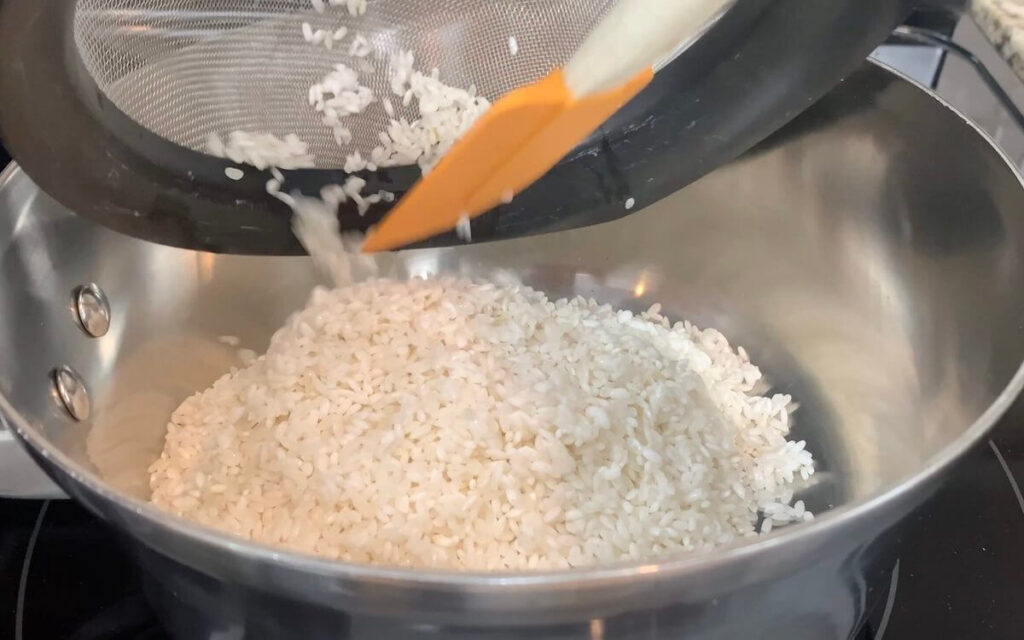

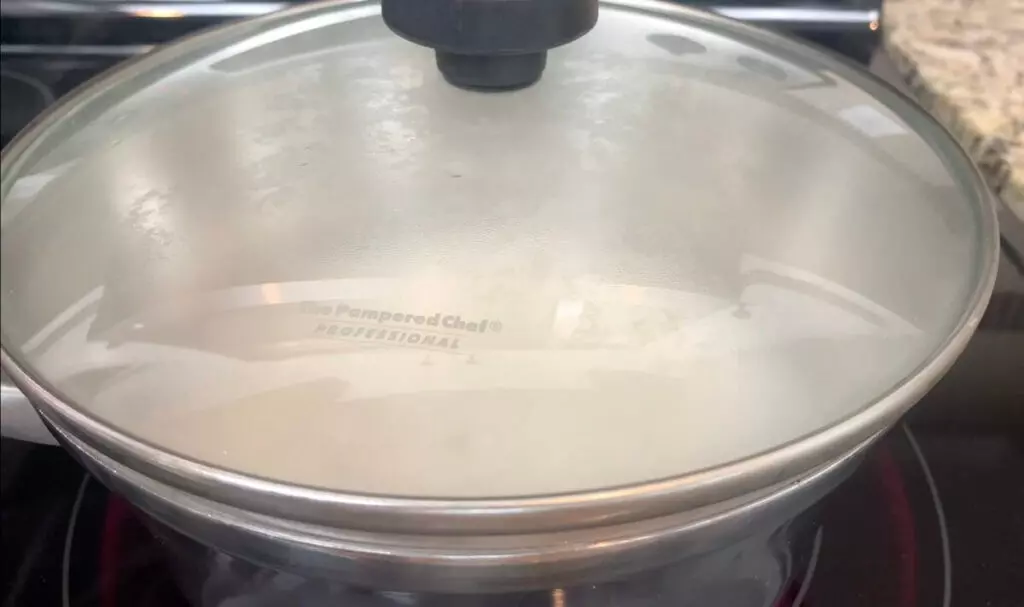
3. Bring the water to a boil and then reduce the heat to low. Cover and let the rice simmer for 20 to 30 minutes, or until the water is absorbed and the rice is soft.

4. Remove the rice and place into a bowl or dish and let cool. I would line the dish with parchment paper prior to adding the rice to avoid sticking.
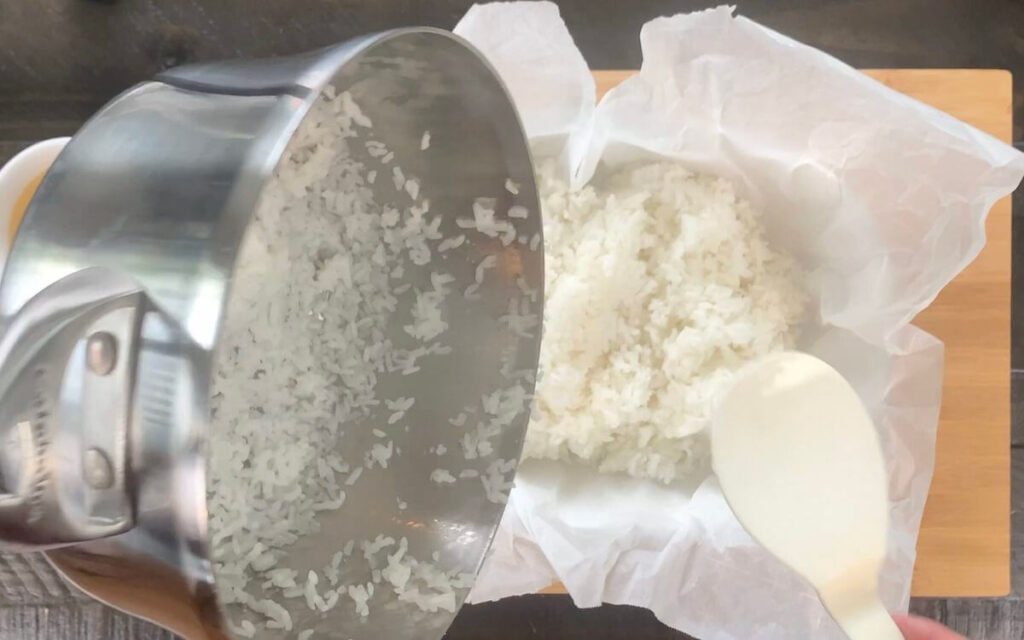

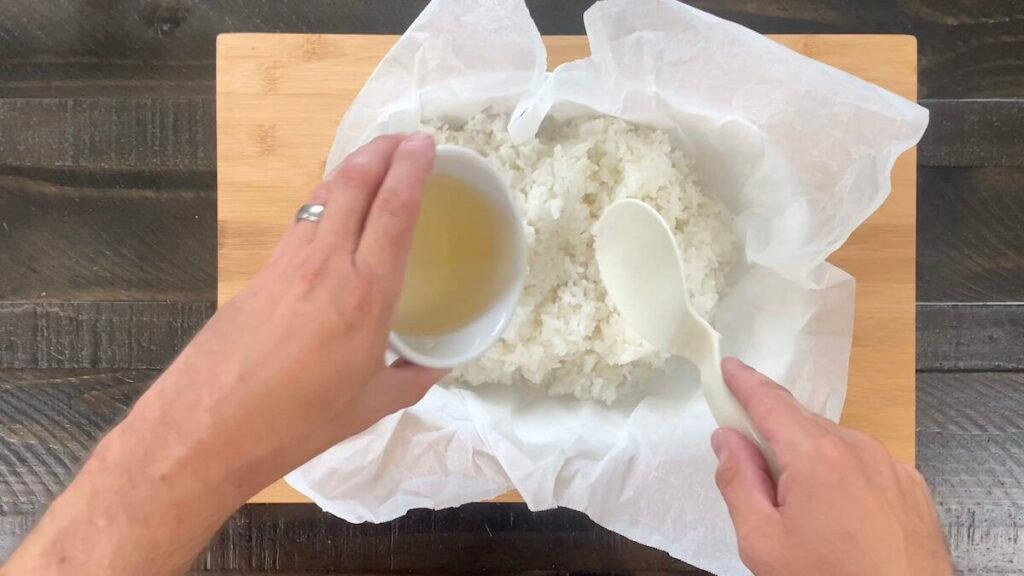
5. Mix 1/4 cup of sushi vinegar into your rice. Stir until the vinegar has absorbed into the rice. Once cooled and fully absorbed, your rice is ready to roll!

Prepare the Tamagoyaki
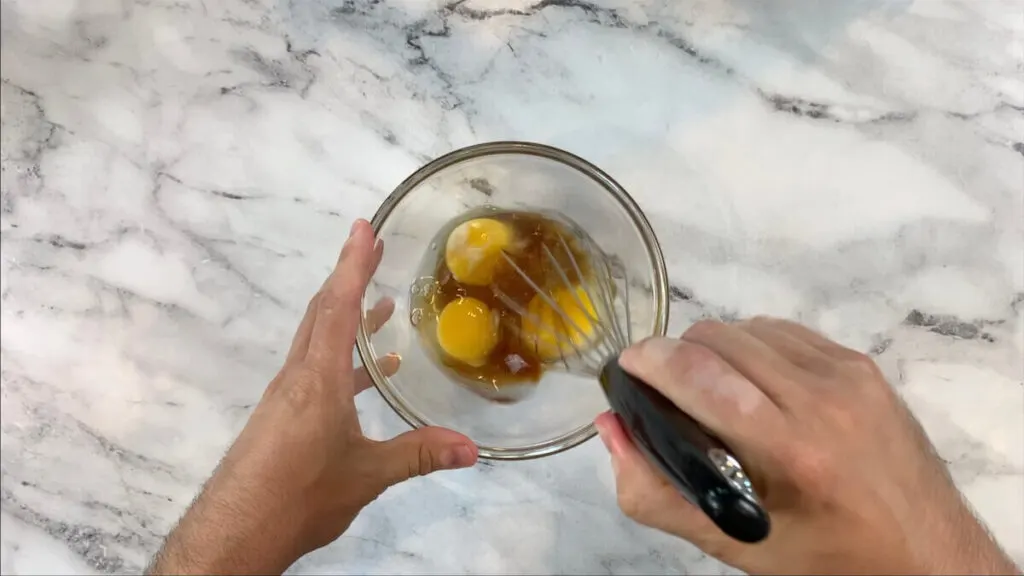
1. Add the eggs, mirin, soy sauce, sugar, and dashi powder to a mixing bowl and whisk until everything is thoroughly mixed. I like using dashi powder in this mixture because it provides a strong concentration of dashi flavor to the omelette. However, you can substitute with two tablespoons of dashi if you would like a more subtle dashi flavor in your tamagoyaki.

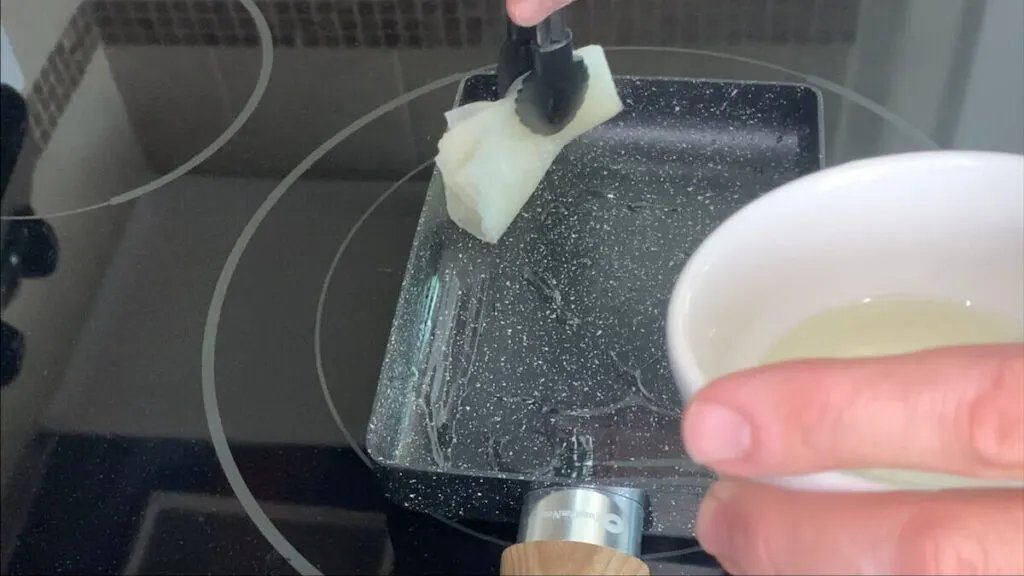
2. Heat a tamagoyaki pan or skillet on medium heat until hot.
3. Spread a thicker layer of oil on the bottom of the pan. I soak a folded paper towel in canola oil and use that to spread oil across the bottom and sides of the pan with tongs or chopsticks.

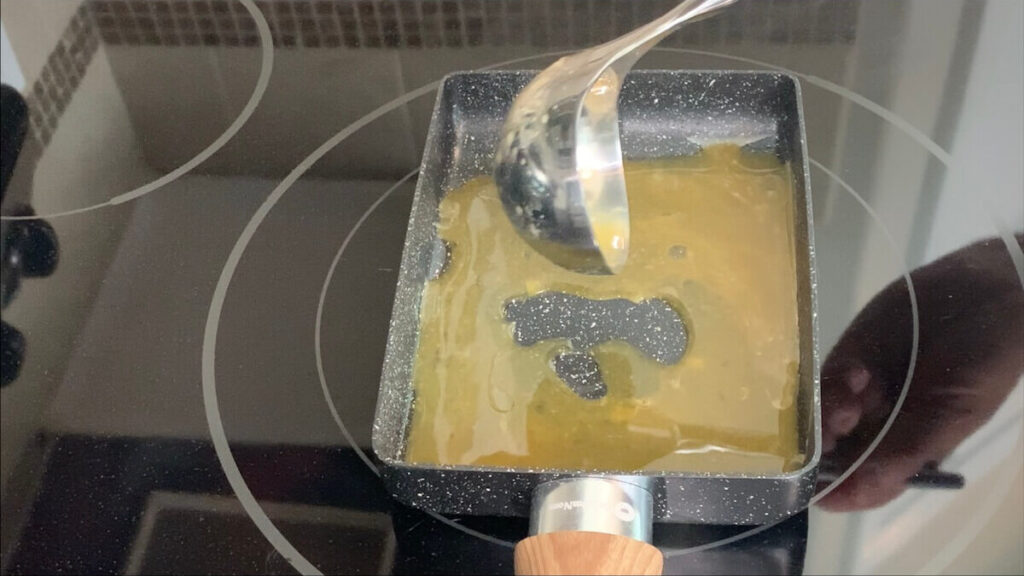
4. Pour approximately 1/4 of the egg mixture onto the bottom of the pan. Tilt the pan to make sure it’s evenly spread across the bottom of the pan.

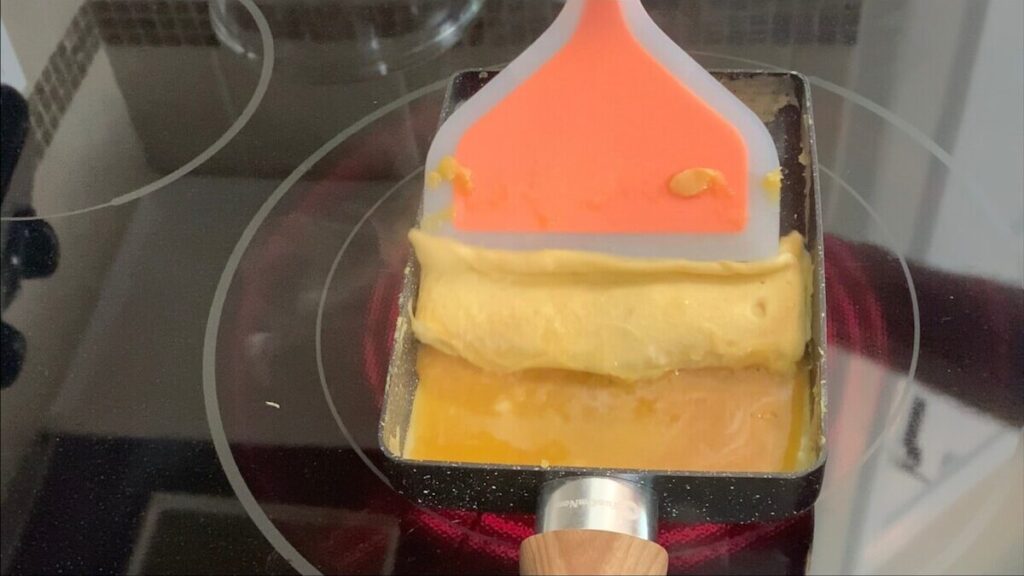
5. Once the egg starts cooking (around 30 seconds depending on how hot the pan is), use a spatula or chopsticks to fold the egg mixture on top of itself towards one side of the pan. At this point it doesn’t need to look perfect. The tamagoyaki will look better with each layer you add. Tip: Check out the video for this recipe to see a demonstration of this process.
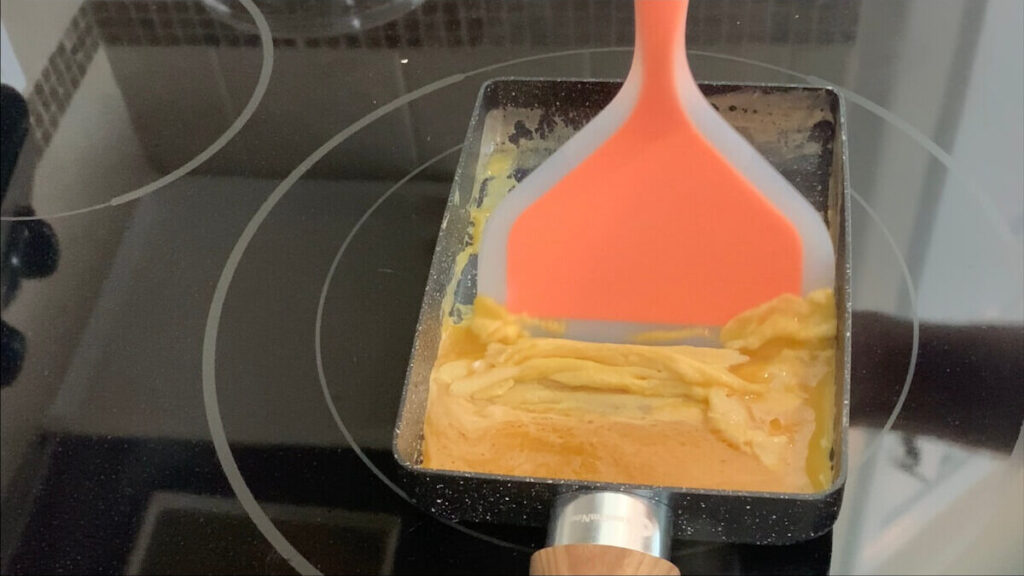
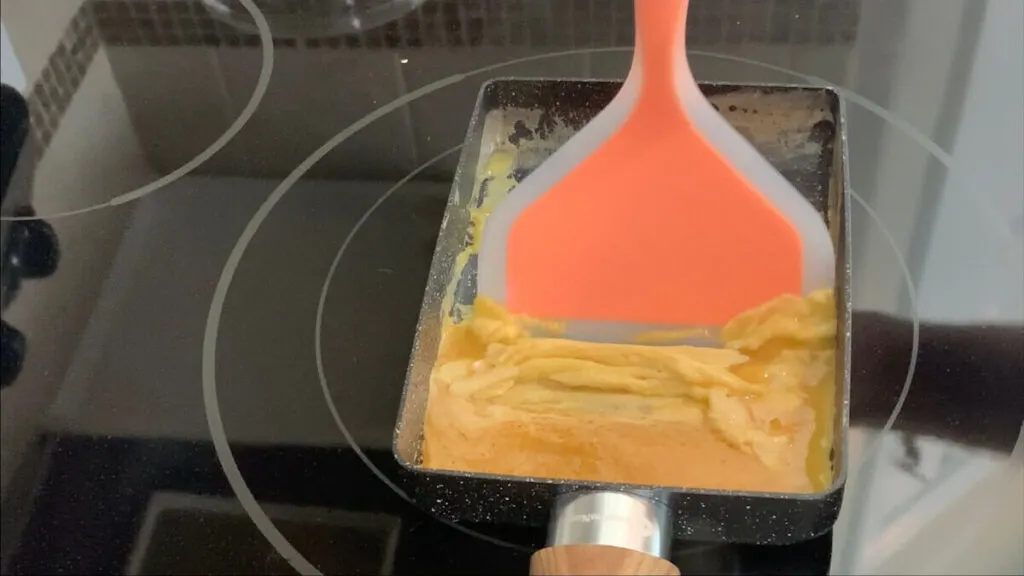
6. Add another 1/4 of the mixture to the bottom of the pan. Gently lift the mixture that has already been folded and tilt the pan assuring the mixture is spread evenly across the bottom of the pan (including under the mixture that has already been folded).
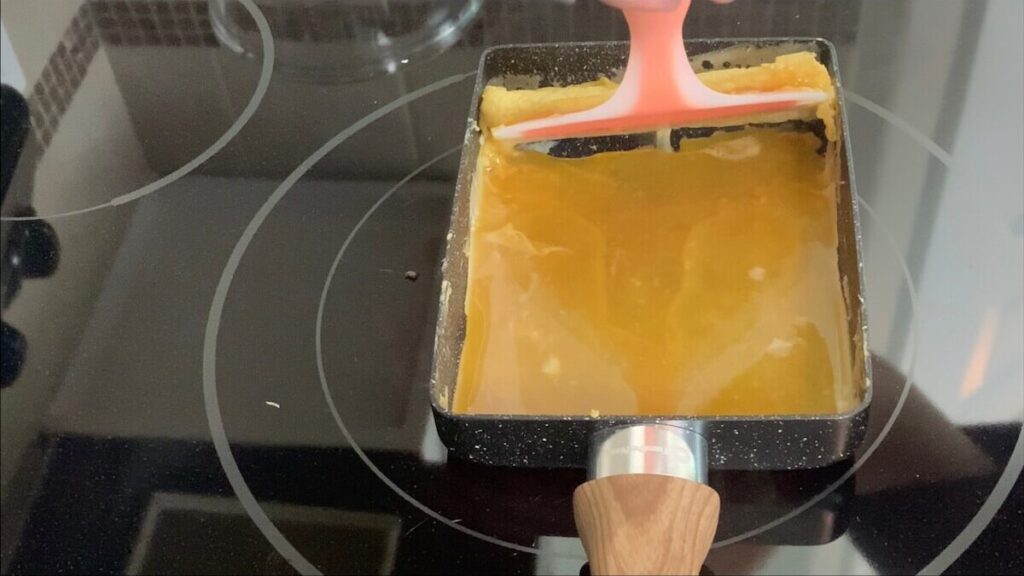
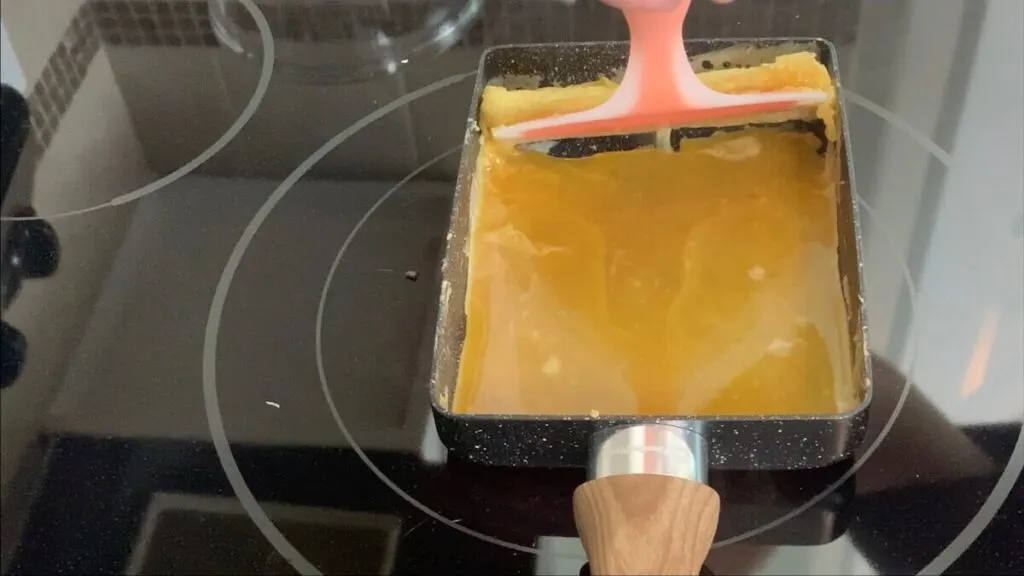
7. Once the second layer of egg starts cooking, use a spatula or chopsticks to fold the egg mixture on top of itself and the already cooked layer of folded egg. I like to use a spatula to form the egg into a rectangle shape as you fold each layer.

8. Repeat the process two more times until all the egg mixture has been used. You may need to add more oil to the pan between layers if you find that your eggs are sticking.
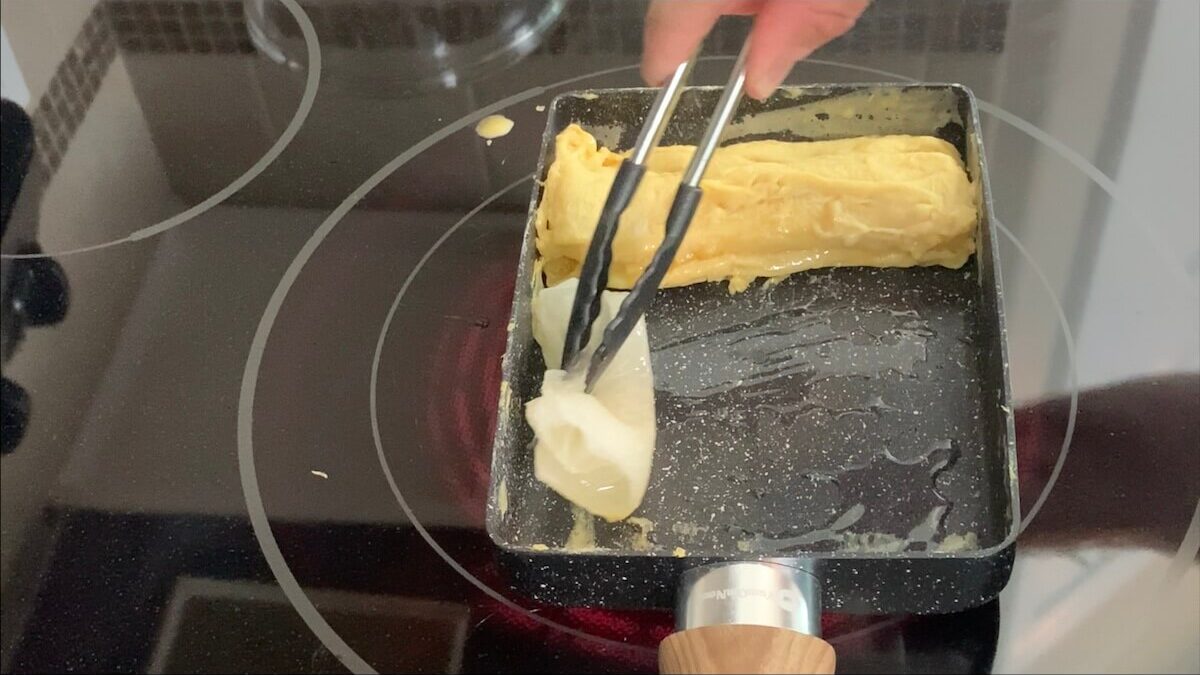

9. After the final layer, use a spatula to shape the tamagoyaki into a rectangular shape against the pan.
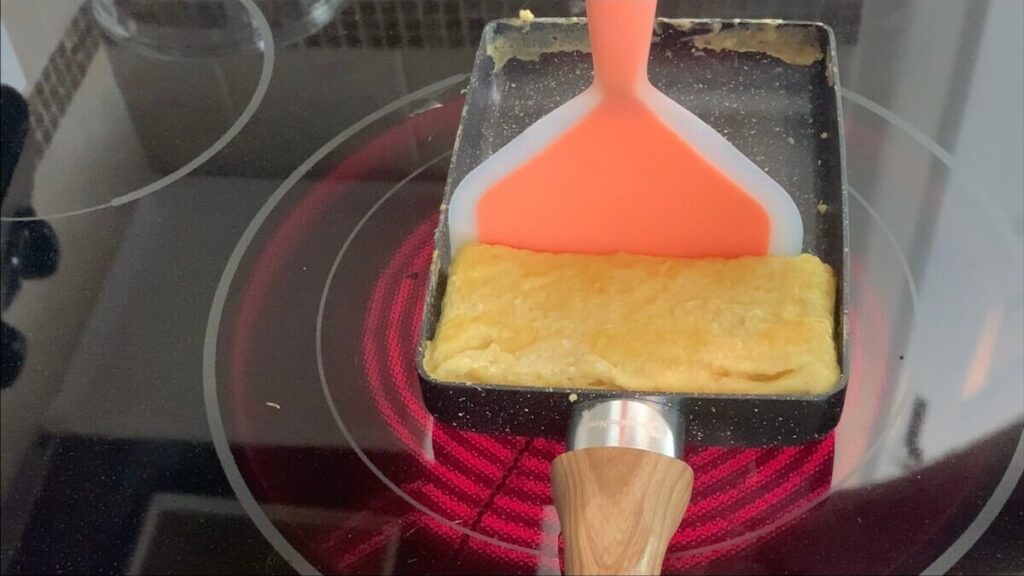

10. Once cooked, slice into 8 evenly sized slices.
11. Set aside until you are ready to add to your roll.
Prepare the Eel
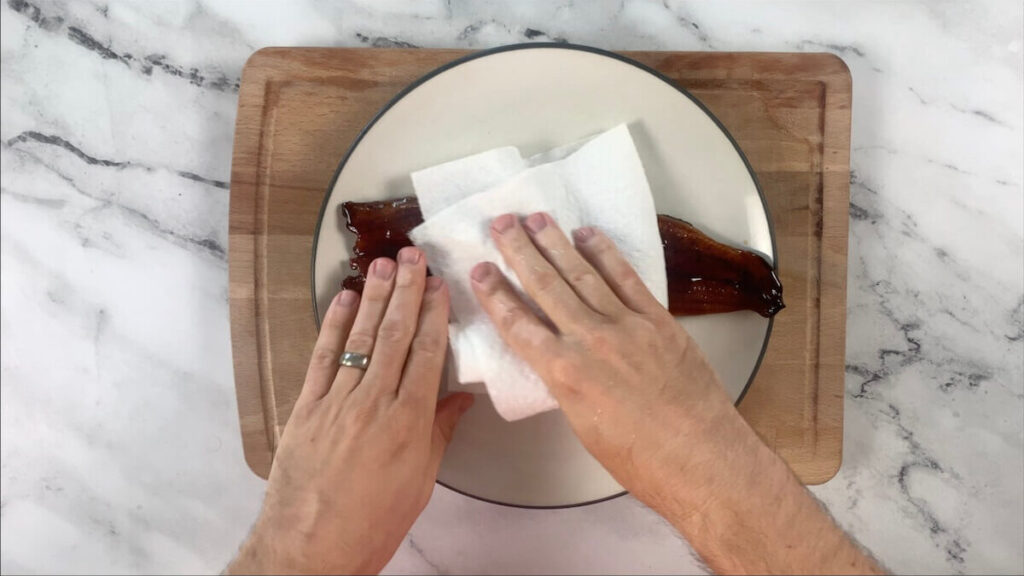
1. Remove the eel fillet from the package and place on a plate.

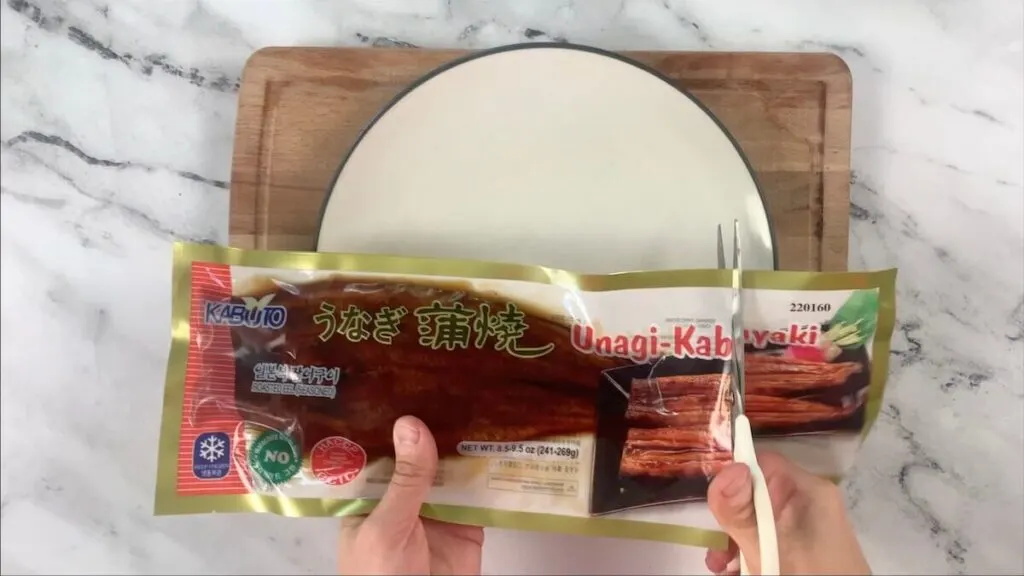
2. Wipe the existing sauce from the eel with a paper towel or cloth. Many chefs don’t do this but I don’t love the sauce that comes on the eel. I instead prefer to add my own unagi sauce to the eel.

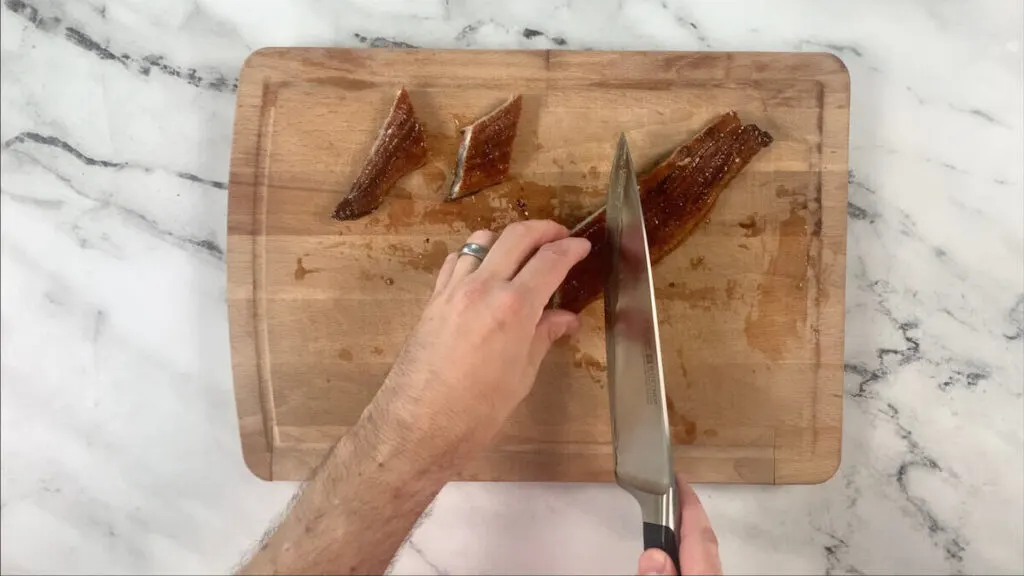
3. Once the sauce is removed, slice the eel in half down the center creating two long fillets.

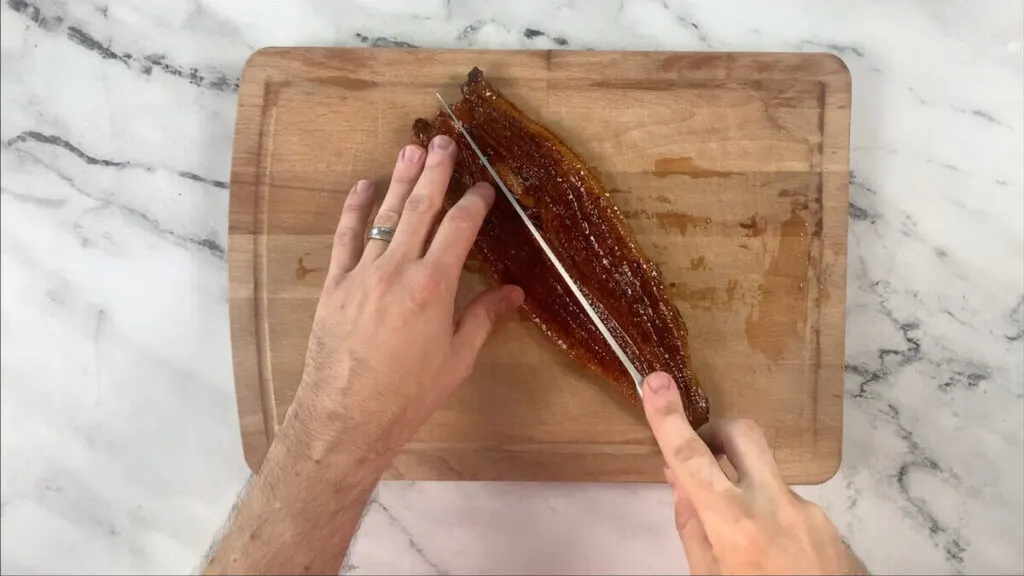
4. Place half of the eel fillet at a 45 degree angle on the cutting board. Then cut the eel into slices an inch or so wide and around 3 inches long. When cutting, tilt your knife at a 45 degree angle.

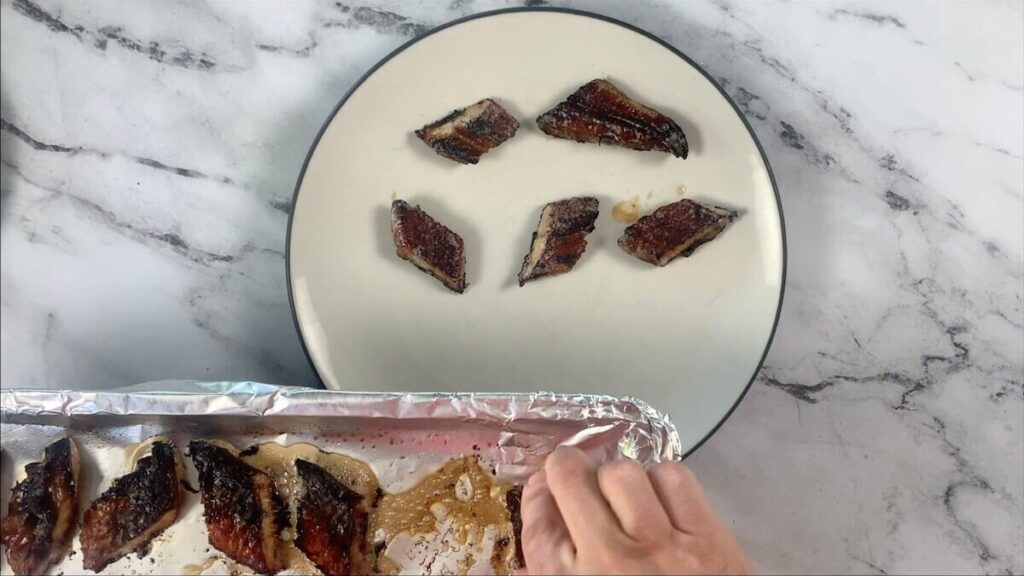
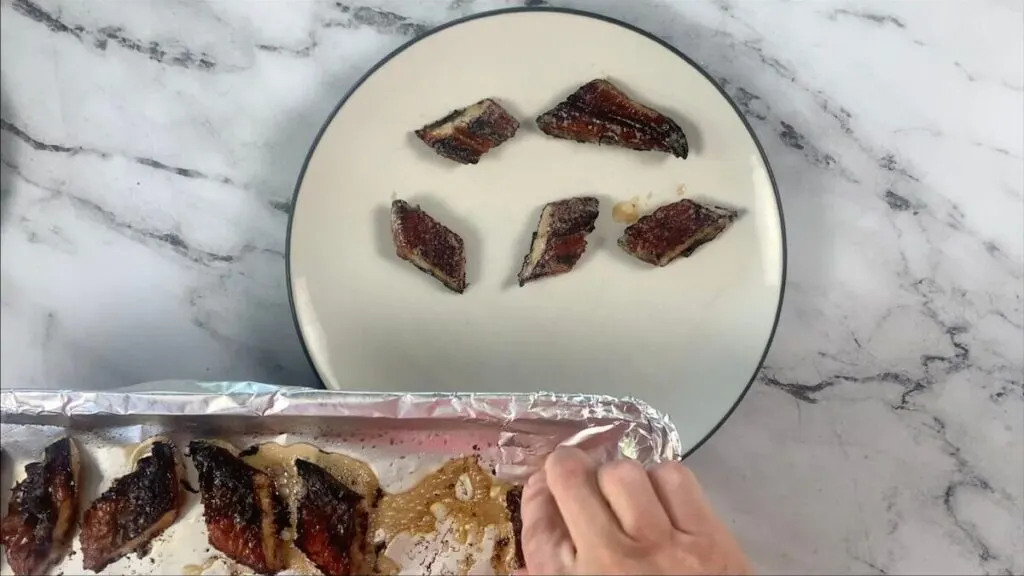
5. Add the eel strips to a greased baking sheet skin side up and broil on high for six minutes. Place on the top rack so it’s around nine inches from the heat.
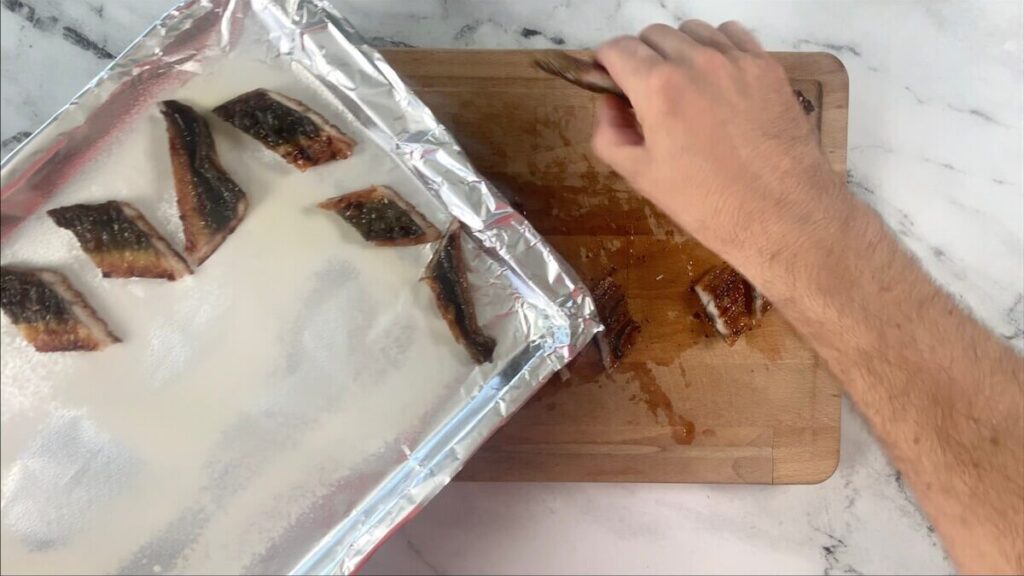

6. After broiling, quickly remove the eel from the baking sheet and place on a plate to be used in the sushi later.
Prepare Seasoned Shiitake and Carrots
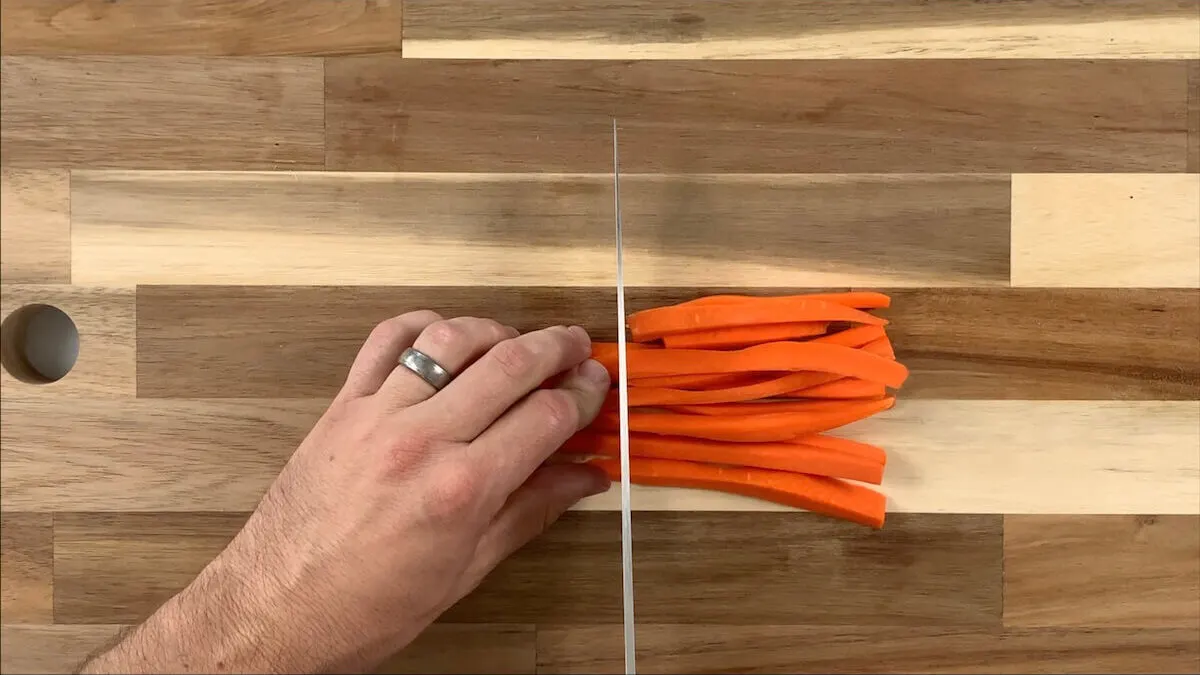
1. Peel and slice the carrot into thin strips about half as long as the nori sheet.

2. After soaking, remove the shiitake mushrooms from the bowl and squeeze out the excess water making sure to save the water for a later step.
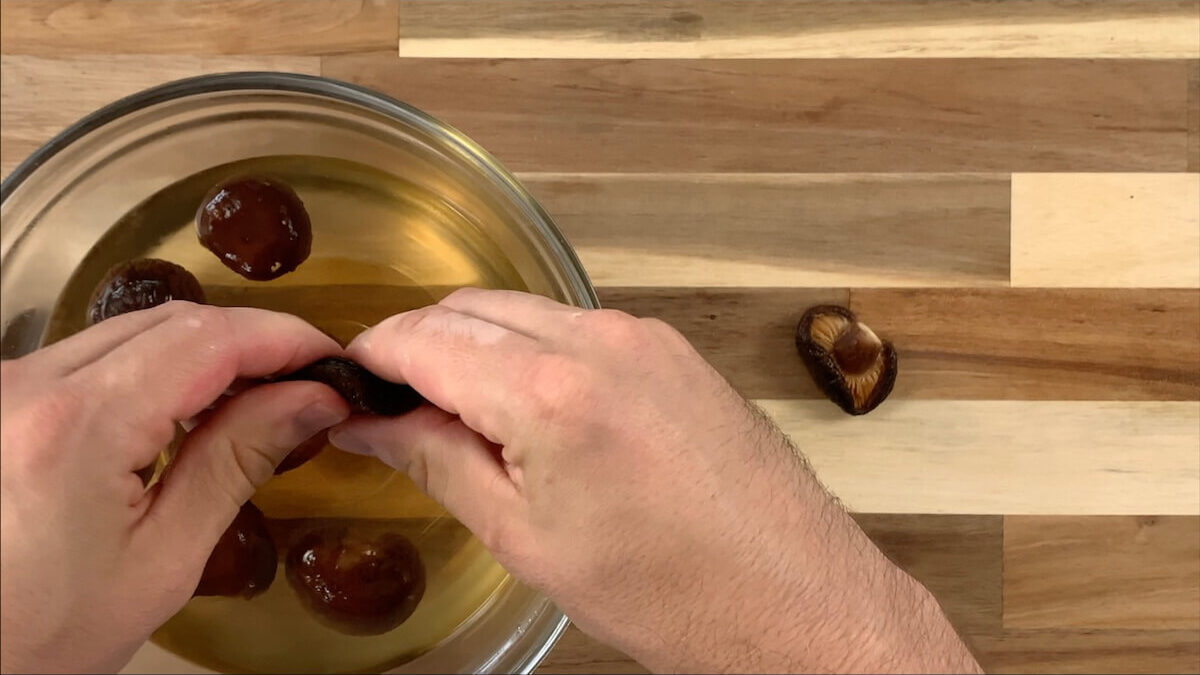
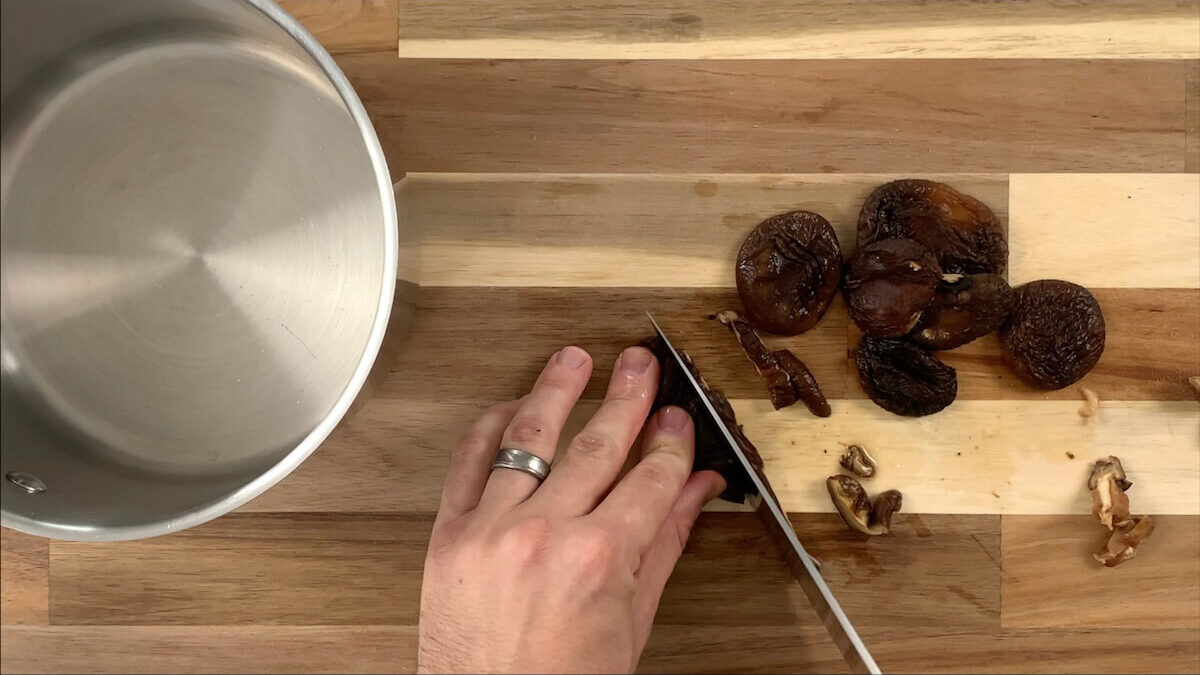
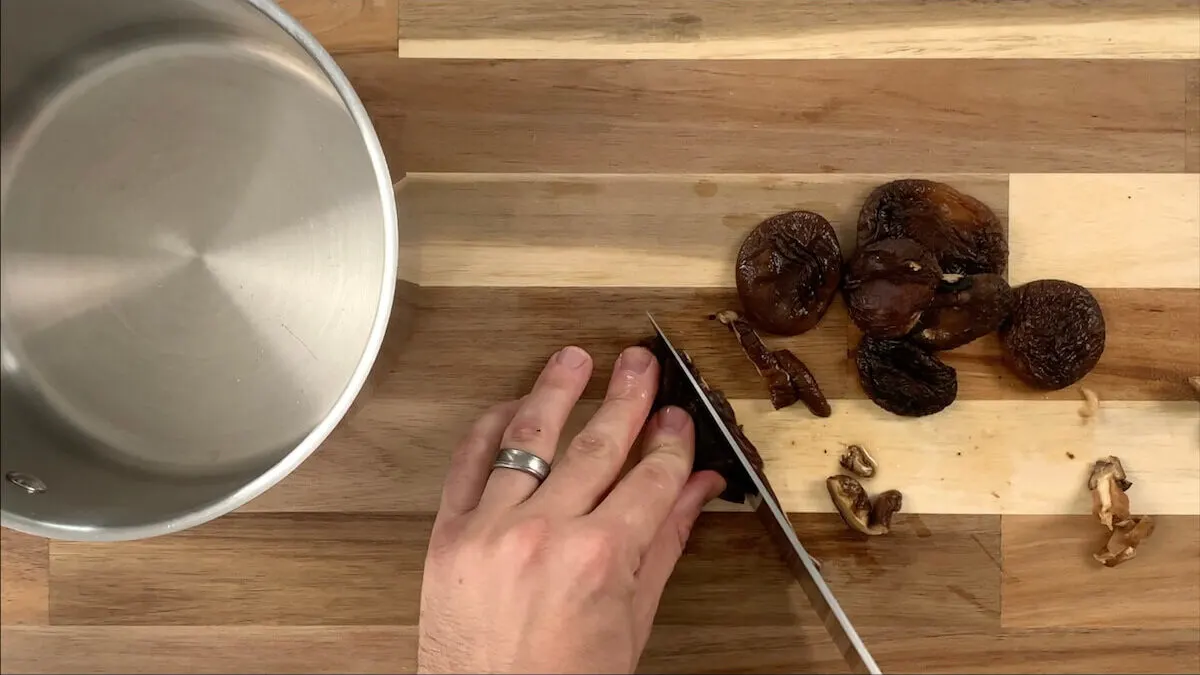
3. Remove the stems from the mushrooms and slice into thin strips.
4. Add the mushrooms and carrots to a small sauce pot with 1/2 cup of the water the mushrooms were soaking in.
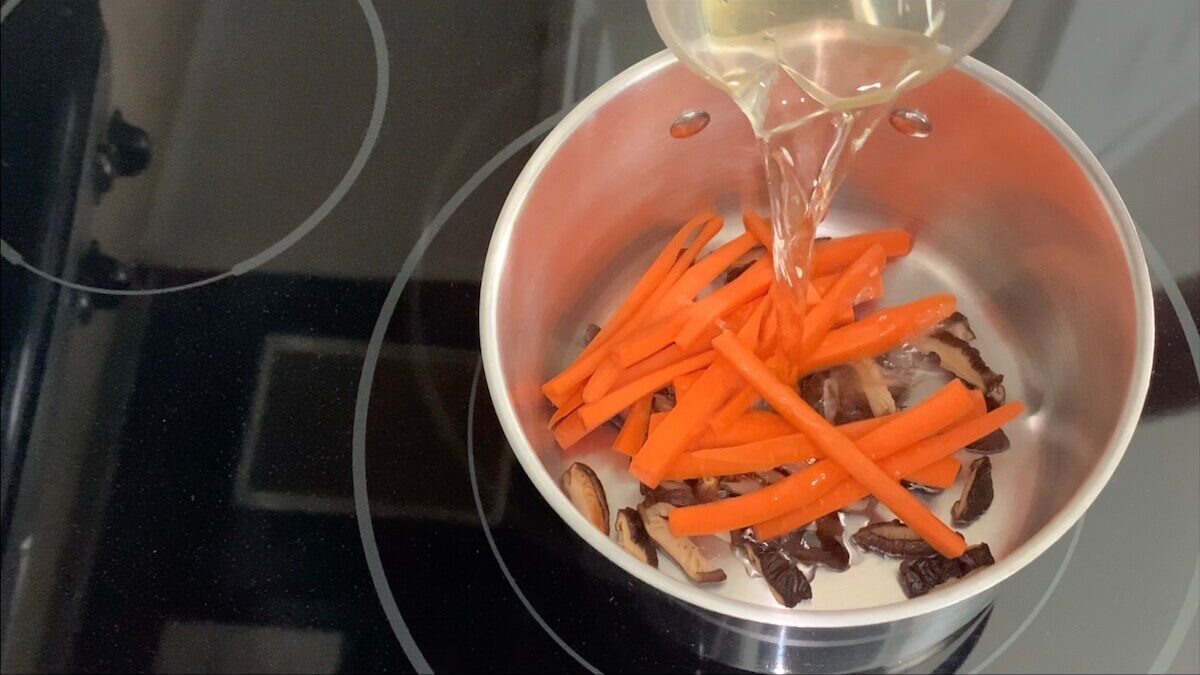

5. Add the dashi, mirin, soy sauce, and sugar to the pot with the vegetables and slowly bring to a boil on medium heat.
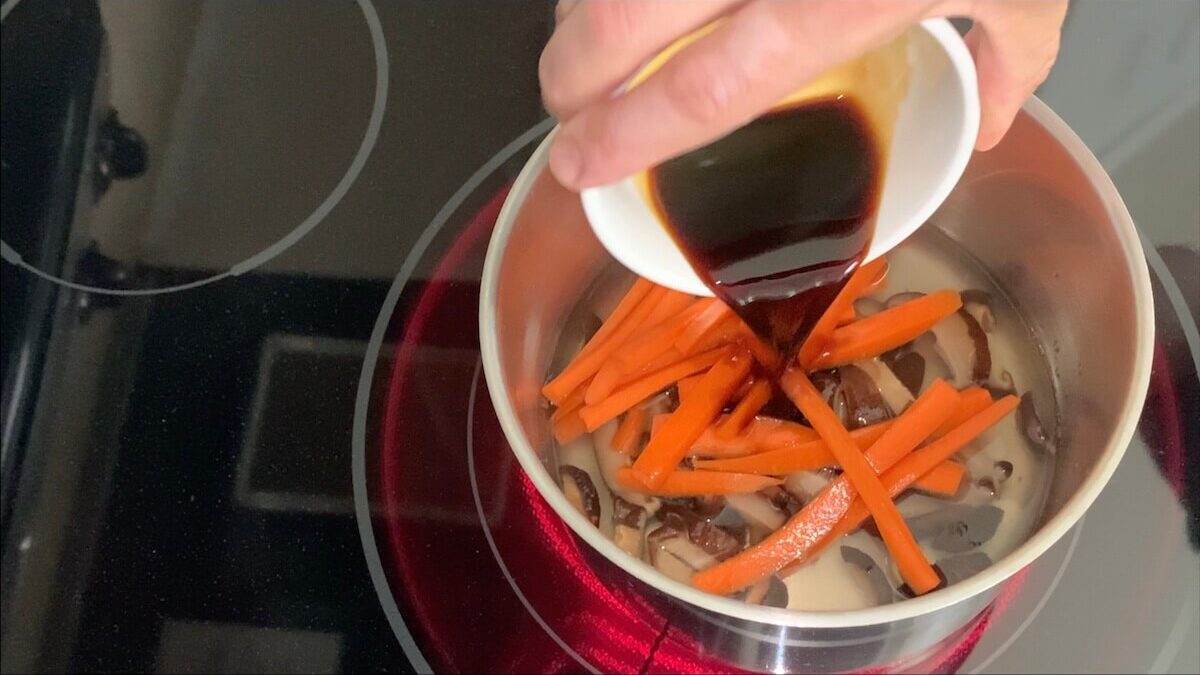

6. Once boiling, reduce the heat and let simmer for 10 minutes.

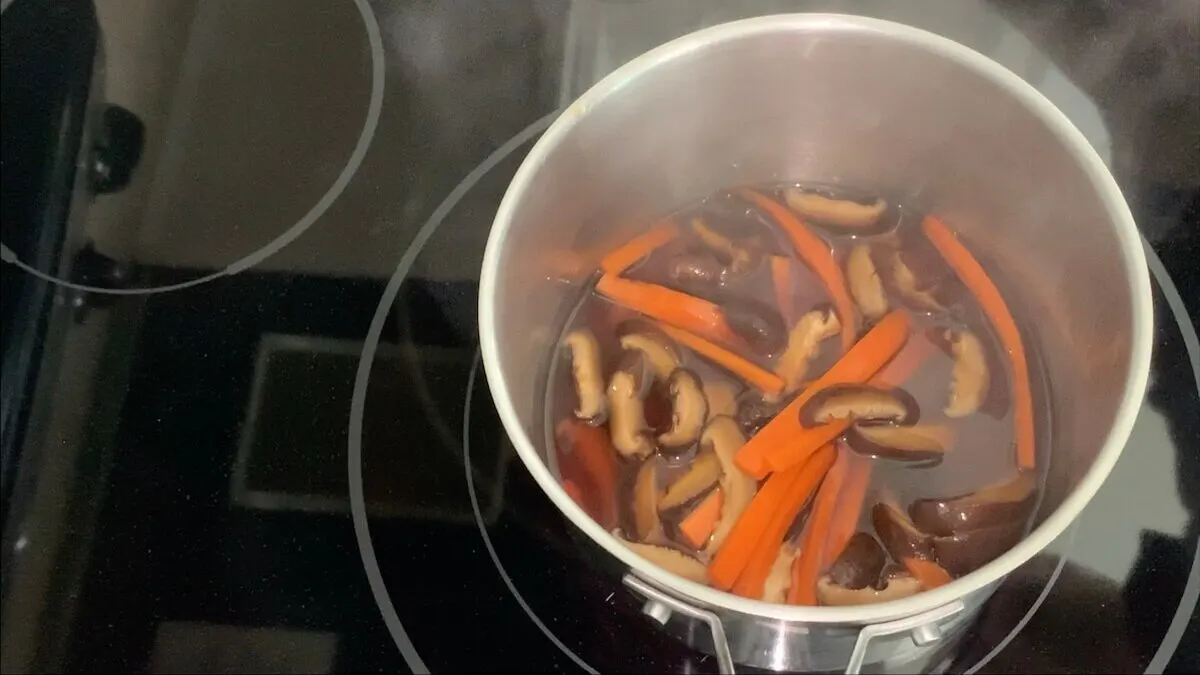
7. After 10 minutes, immediately strain mushrooms and carrots from liquids to avoid overcooking.
Assemble the Futomaki Rolls
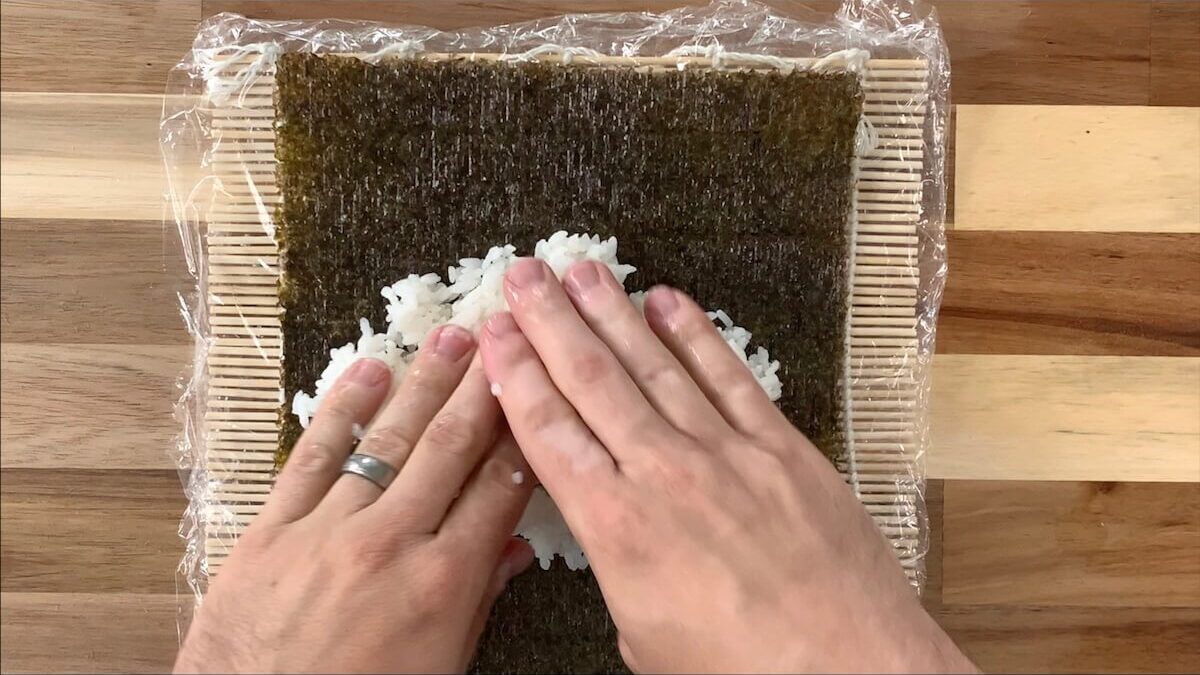
1. Cover your bamboo sushi mat with plastic wrap. This will help keep the rice from sticking to it.
2. Slice the cucumbers into strips that are as long as your nori sheet and about 1/8 inch thick.
3. Next, place the nori sheet onto the plastic wrap with the shiny side facing down. Then press around 1 cup of rice onto the nori sheet in an even layer onto the bottom of the nori sheet leaving around an inch at the top of the nori sheet open. This open section will be used to seal the roll when we roll it. Tip: Wet your hands in a bowl of water mixed with a splash of rice vinegar prior to handling the sushi rice. This will prevent the rice from sticking to your hands.

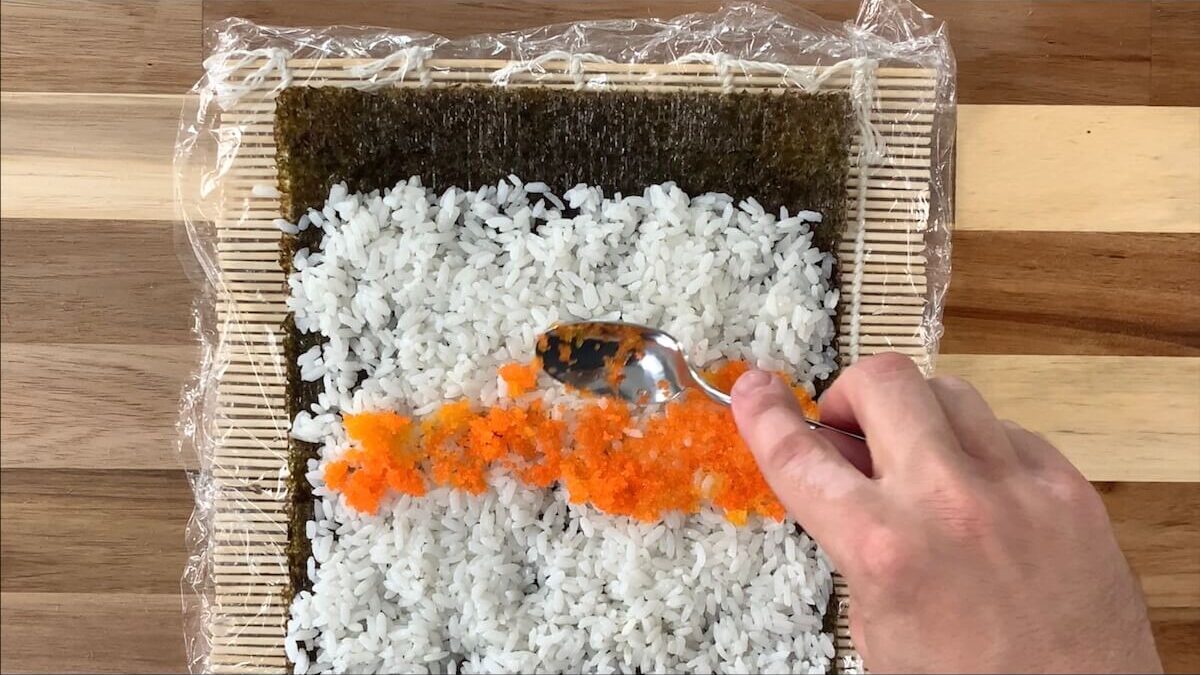
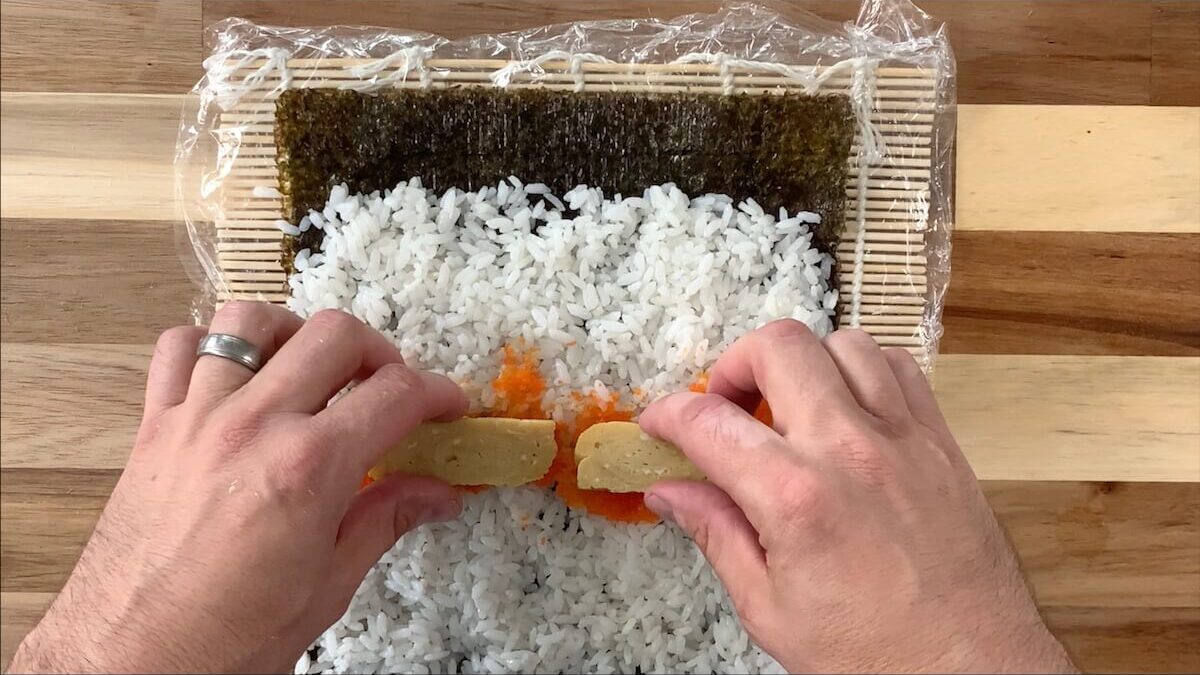
4. Add around a tablespoon or so of masago in an even row across the rice on the nori sheet.

5. Add two slices of the tamagoyaki in a row across the nori sheet.

6. Add around 1/4 of your shiitake mushroom and carrot mixture across the center of the nori sheet.

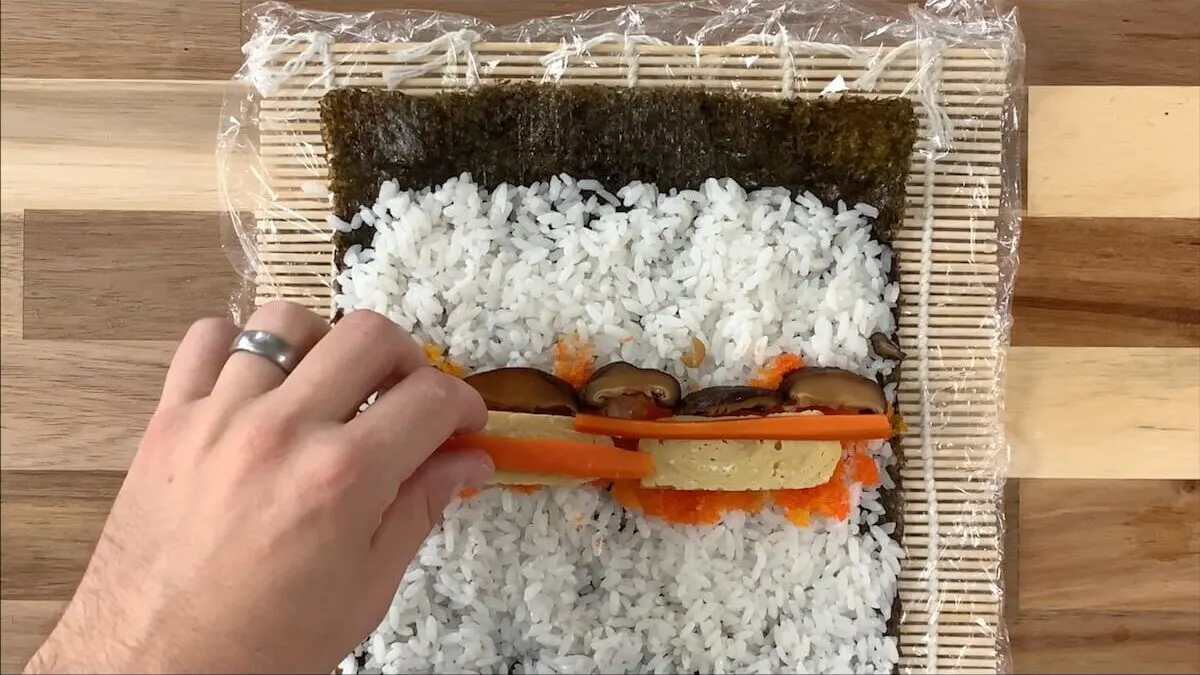
7. Add 3-5 pieces of eel across the nori sheet depending on how well they fit.
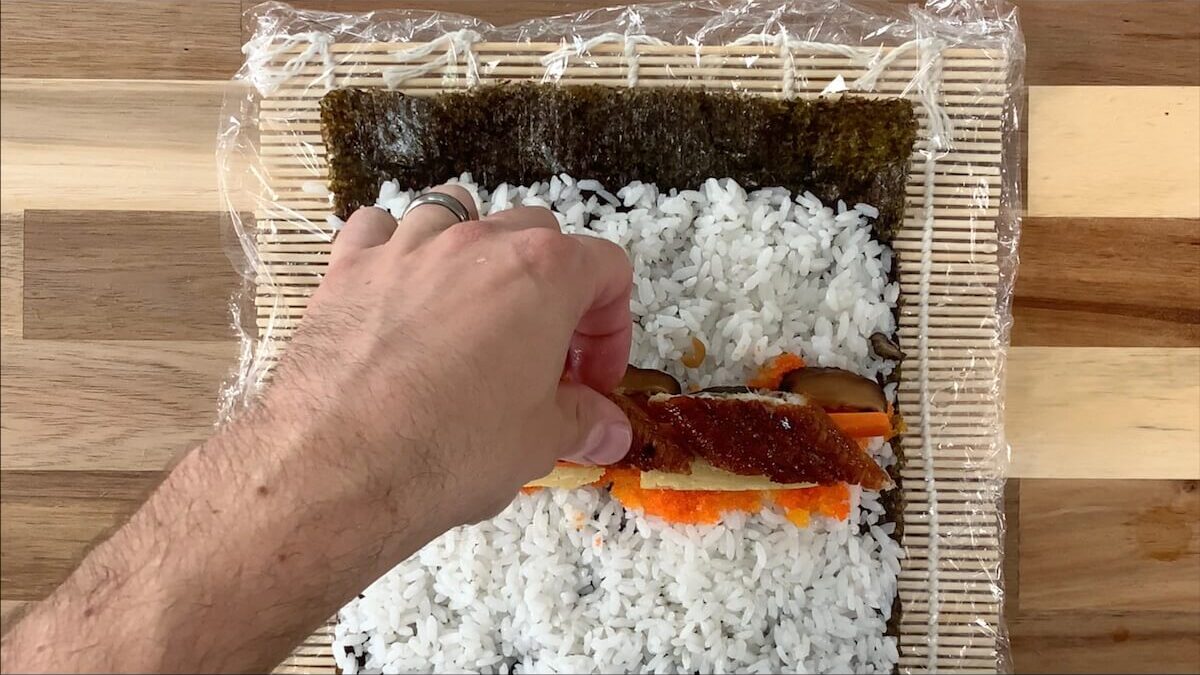

8. Spread a line of unagi sauce across over the eel.

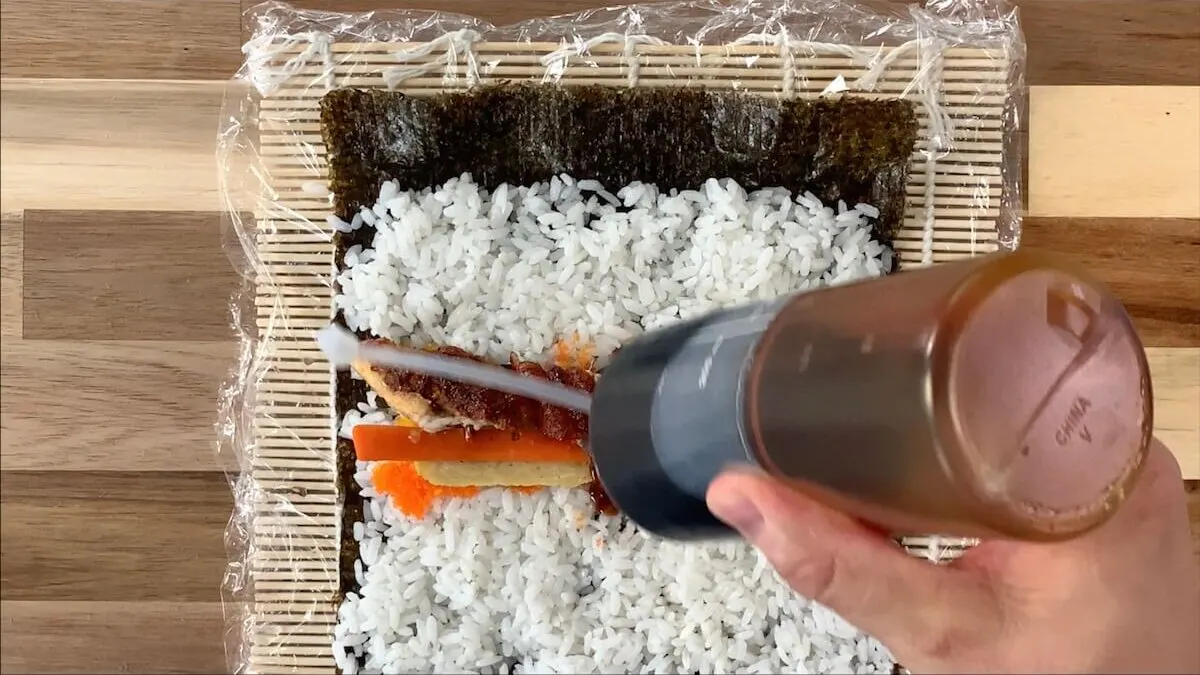
9. Add 1-2 cucumber sticks depending on the size of each ingredient and how everything fits.

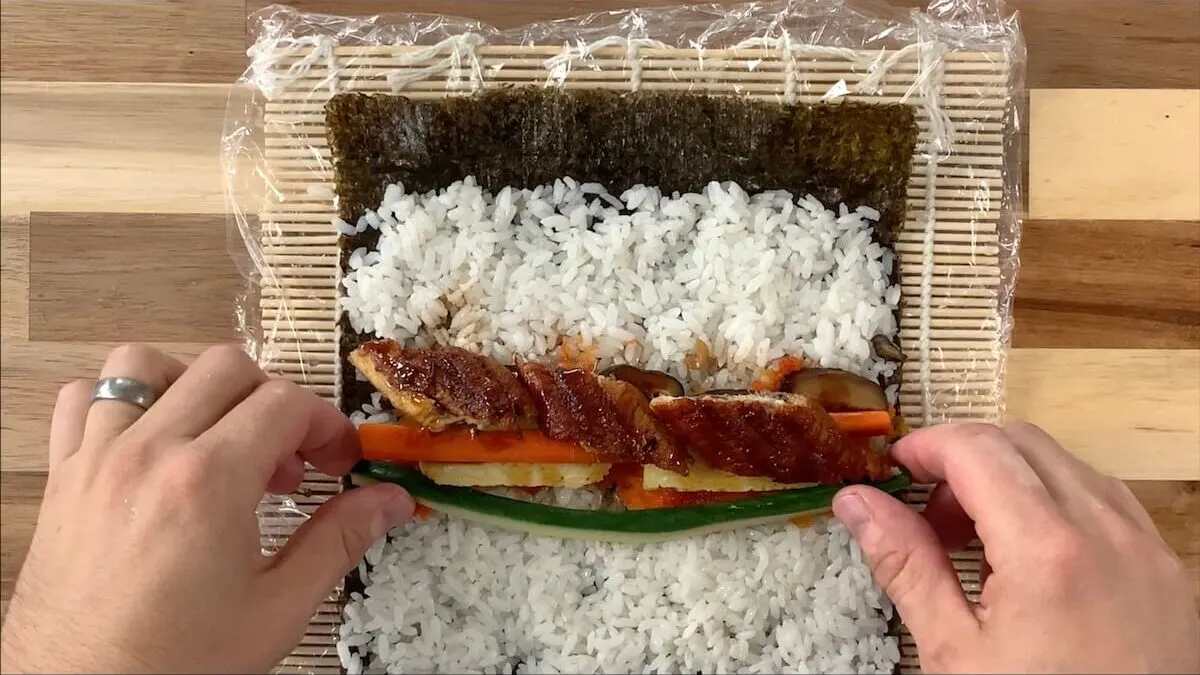
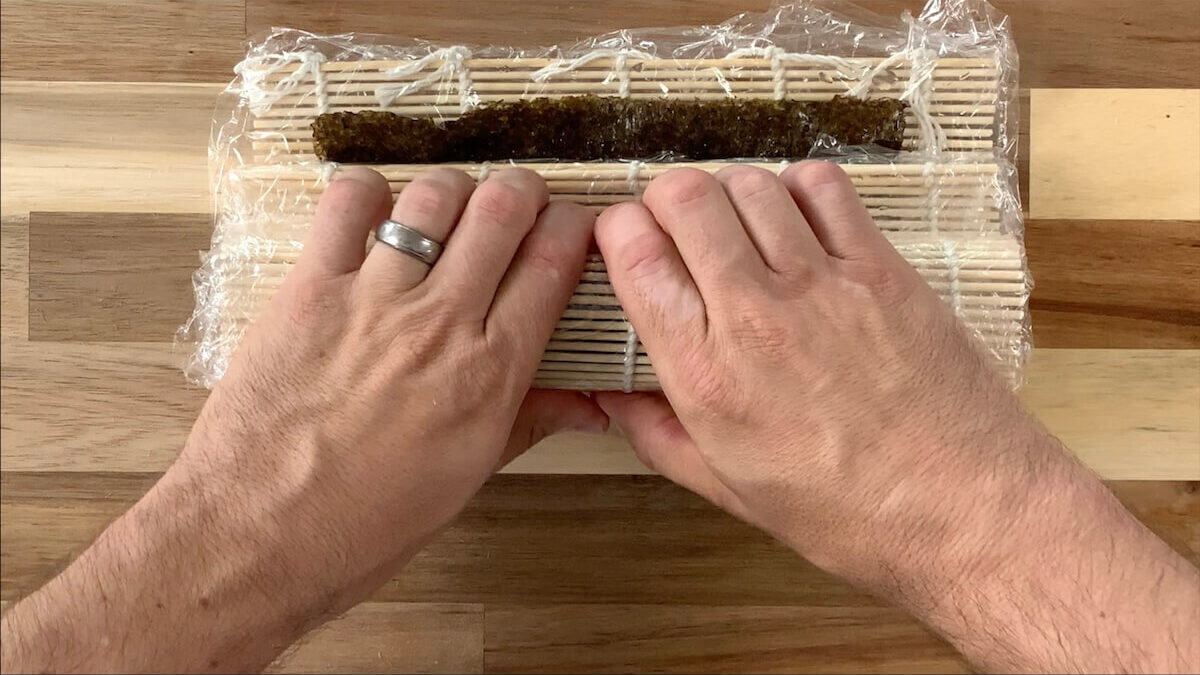
10. To roll the sushi, start by wetting the top portion of the nori sheet that is not covered by rice. Then use the bamboo sushi mat to fold your roll until it’s completely enclosed. Once the nori is making contact with the roll, pull back the sushi mat so it doesn’t get caught in the roll. Still using the sushi mat as your guide, finish rolling until the roll is completely wrapped. Use the wet portion of the nori sheet to seal the roll together. Then wrap the sushi mat around the roll and gently tighten the roll together. Keep in mind that rolling sushi is an art that may take some practice so don’t get frustrated if it doesn’t look perfect your first time. It will get easier the more you do it. Tip: Check out the video for a demonstration on how to roll sushi.

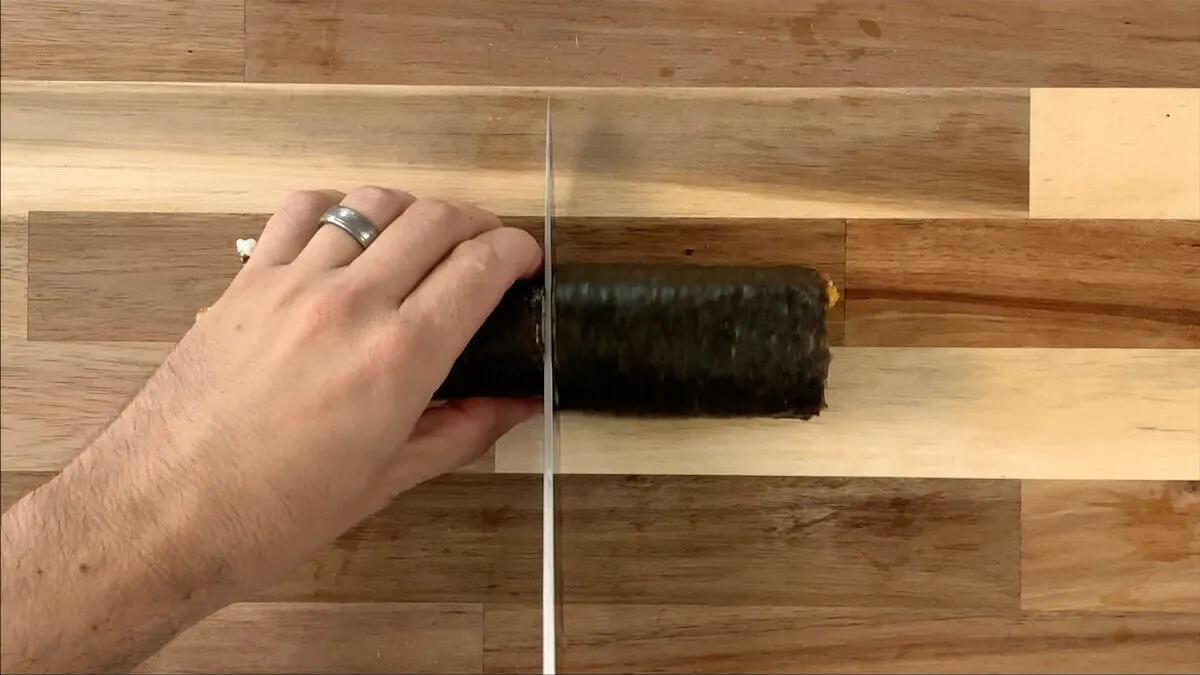
11. Using a sharp knife, cut the roll into 8 pieces. I do this by first cutting the roll in half. I then cut each half in half followed by cutting each fourth in half. Tip: Be sure to clean and wet the edge of your knife before cutting each roll.

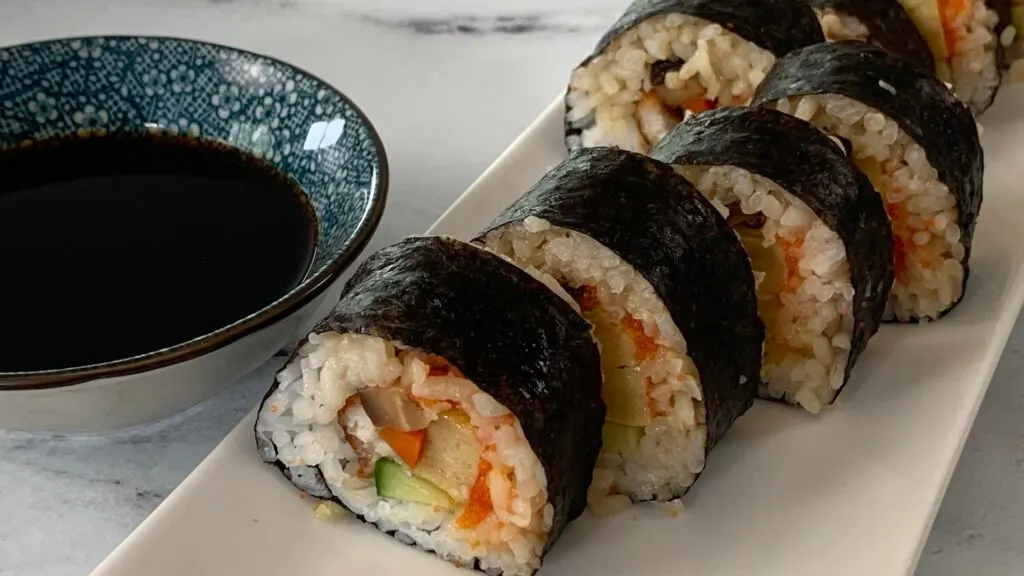
12. Serve with soy sauce, wasabi, and ginger. Enjoy!
Futomaki Recipe

Futomaki Roll Recipe
Equipment
- 1 Bamboo Sushi Mat
- 1 Pot for cooking sushi rice
- 1 Sharp knife and cutting board
Ingredients
Sushi Rice
- 1 1/3 cups Sushi Rice dried, will cook to 4 cups
- 1/4 cup Sushi Vinegar
Eel (Unagi) Sauce
- 1/2 Cup Soy Sauce
- 1/2 Cup Mirin
- 1/2 Cup Sugar
Seasoned Shiitake and Carrots
- 8 Shiitake mushrooms
- 1 Carrot
- 1/2 Cup Dashi
- 2 Tbsp Mirin
- 2 Tbsp Soy Sauce
Prepare the Tamagoyaki
- 3 Eggs
- 1 Tbsp. Mirin
- 1 tsp. Dashi powder
- 1 tsp. Sugar
- 1 tsp. Soy sauce
- Canola oil
Roll and Filling
- 1 Eel Fillet 8 oz.
- 4 Nori Sheets
- 1 Japanese Cucumber Sliced into 1/8 sticks
- Masago
Instructions
- Thaw the eel fillet by putting it in the fridge the night before you plan to use it. If you're in a time crunch, you can also thaw it quickly by running the package through warm water.
- Rehydrate your shiitake mushrooms by soaking them in cold water for at least 20 minutes. However, the longer you soak your shiitakes the better (overnight in the fridge is ideal).
Cook Sushi Rice
- Rinse 1 2/3 cups of sushi rice by placing it in a colander and running water through it until the water is clear.
- After the rice is rinsed, add it to a sauce pan with 1 2/3 cups of water. I would check the instructions on the sushi rice package to see exactly how much water to add as it can vary depending on the brand.
- Bring the water to a boil and then reduce the heat to low. Cover and let the rice simmer for 20 to 30 minutes, or until the water is absorbed and the rice is soft.
- Remove the rice and place into a bowl or dish and let cool. I would line the dish with parchment paper prior to adding the rice to avoid sticking.
- Mix 1/4 cup of sushi vinegar into your rice. Stir until the vinegar has absorbed into the rice. Once cooled and fully absorbed, your rice is ready to roll!
Prepare the Tamagoyaki
- Add the eggs, mirin, soy sauce, sugar, and dashi powder to a mixing bowl and whisk until everything is thoroughly mixed. I like using dashi powder in this mixture because it provides a strong concentration of dashi flavor to the omelette. However, you can substitute with two tablespoons of dashi if you would like a more subtle dashi flavor in your tamagoyaki.
- Heat a tamagoyaki pan or skillet on medium heat until hot.
- Spread a thicker layer of oil on the bottom of the pan. I soak a folded paper towel in canola oil and use that to spread oil across the bottom and sides of the pan with tongs or chopsticks.
- Pour approximately 1/4 of the egg mixture into the bottom of the pan. Tilt the pan to make sure it's evenly spread across the bottom of the pan.
- Once the egg starts cooking (around 30 seconds depending on how hot the pan is), use a spatula or chopsticks to fold the egg mixture on top of itself towards one side of the pan. At this point it doesn't need to look perfect. The tamagoyaki will look better with each layer you add. Tip: Check out the video for this recipe to see a demonstration of this process.
- Add another 1/4 of the mixture to the bottom of the pan. Gently lift the mixture that has already been folded and tilt the pan assuring the mixture is spread evenly across the bottom of the pan (including under the mixture that has already been folded).
- Once the second layer of egg starts cooking, use a spatula or chopsticks to fold the egg mixture on top of itself and the already cooked layer of folded egg. I like to use a spatula to form the egg into a rectangle shape as you fold each layer.
- Repeat the process two more times until all the egg mixture has been used. You may need to add more oil to the pan between layers if you find that your eggs are sticking.
- After the final layer, use a spatula to shape the tamagoyaki into a rectangle shape against the pan.
- Once cooked, slice into 8 evenly sized slices.
- Set aside until you are ready to add to your roll.
Prepare the Eel
- Remove the eel fillet from the package and place on a plate.
- Wipe the existing sauce from the eel with a paper towel or cloth. Many chefs don't do this but I don't love the sauce that comes on the eel. I instead prefer to add my own unagi sauce to the eel.
- Once the sauce is removed, slice the eel in half down the center creating two long fillets.
- Place half of the eel fillet at a 45 degree angle on the cutting board. Then cut the eel into slices an inch or so wide and around 3 inches long. When cutting, tilt your knife at a 45 degree angle.
- Add the eel strips to a greased baking sheet skin side up and broil on high for six minutes. Place on the top rack so it is around nine inches from the heat.
- After broiling, quickly remove the eel from the baking sheet and place on a plate to be used in the sushi later.
Prepare Seasoned Shiitake and Carrots
- Peel and slice the carrot into thin strips about half as long as the nori sheet.
- After soaking, remove the shiitake mushrooms from the bowl and squeeze out the excess water making sure to save the water for a later step.
- Remove the stems from the mushrooms and slice into thin strips.
- Add the mushrooms and carrots to a small sauce pot with 1/2 cup of the water the mushrooms were soaking in.
- Add the dashi, mirin, soy sauce, and sugar to the pot with the vegetables and slowly bring to a boil on medium heat.
- Once boiling, reduce the heat and let simmer for 10 minutes.
- After 10 minutes, immediately strain mushrooms and carrots from liquids to avoid overcooking.
Assemble the Futomaki Rolls
- Cover your bamboo sushi mat with plastic wrap. This will help keep the rice from sticking to it.
- Slice the cucumbers into strips that are as long as your nori sheet and about 1/8 inch thick.
- Next, place the nori sheet onto the plastic wrap with the shiny side facing down. Then press around 1 cup of rice onto the nori sheet in an even layer onto the bottom of the nori sheet leaving around an inch at the top of the nori sheet open. This open section will be used to seal the roll when we roll it. Tip: Wet your hands in a bowl of water mixed with a splash of rice vinegar prior to handling the sushi rice. This will prevent the rice from sticking to your hands.
- Add around a tablespoon or so of masago in an even row across the rice on the nori sheet.
- Add two slices of the tamagoyaki in a row across the nori sheet.
- Add around 1/4 of your shiitake mushroom and carrot mixture across the center of the nori sheet.
- Add 3-5 pieces of eel across the nori sheet depending on how well they fit.
- Spread a line of unagi sauce across over the eel.
- Add 1-2 cucumber sticks depending on the size of each ingredient and how everything fits.
- To roll the sushi, start by wetting the top portion of the nori sheet that is not covered by rice. Then use the bamboo sushi mat to fold your roll until it is completely enclosed. Once the nori is making contact with the roll, pull back the sushi mat so it doesn't get caught in the roll. Still using the sushi mat as your guide, finish rolling until the roll is completely wrapped. Use the wet portion of the nori sheet to seal the roll together. Then wrap the sushi mat around the roll and gently tighten the roll together. Keep in mind that rolling sushi is an art that may take some practice so don’t get frustrated if it doesn’t look perfect your first time. It will get easier the more you do it. Tip: Check out the video for a demonstration on how to roll sushi.
- Using a sharp knife, cut the roll into 8 pieces. I do this by first cutting the roll in half. I then cut each half in half followed by cutting each fourth in half. Tip: Be sure to clean and wet the edge of your knife before cutting each roll.
- Serve with soy sauce, wasabi, and ginger. Enjoy!
Video
Nutrition
Frequently Asked Questions
Is futomaki a traditional Japanese sushi?
Yes, futomaki is a traditional Japanese sushi and is commonly eaten across the country. Futomaki is especially popular around holidays or other celebrations.
Is futomaki gluten-free?
Given the variety and amount of ingredients, I would assume most futomaki ordered from a restaurant would contain gluten unless specifically stated otherwise. However, if you prepare it yourself you can tailor it to your dietary needs using gluten-free ingredients.
Final Thoughts on Futomaki
Futomaki is a fun roll that my entire family enjoys. As you get more comfortable with preparing futomaki, I encourage you to experiment with ingredients and create your own version specifically tailored to your family’s tastes. Happy cooking!
For more fun recipes, check out the below articles:
Unagi Don (Eel Rice Bowl) Recipe
Also, subscribe to our YouTube Channel for some great videos!